


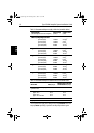

20 Type 150/400 Autopilot System: Installation Guide
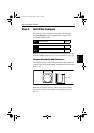
Step 4
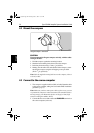
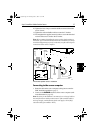
4.2 Mount the compass
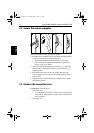
Fluxgate compass - orientation
CAUTION:
You must mount the fluxgate compass vertically, with the cables
exiting at the base.
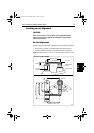
1. Hold the compass against the mounting location.
2. Mark the four mounting holes, then remove the compass.
3. Drill four pilot holes using a 3 mm (
1
/
8
in) drill bit.
4. Making sure the cable exits at the bottom of the compass, secure
the fluxgate compass using the self-tapping screws provided
(No 8 x
3
/
4
in, pan-head).
Note: Stick the supplied warning label near to the compass, where it
is clearly visible.
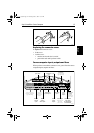
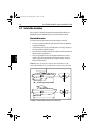
4.3 Connect to the course computer
1. The compass is supplied with 8 m (26 ft) of cable. Route the cable
to the course computer, taking into account the EMC installation
guidelines (page 7).
Note: Make sure you leave some spare cable so, if necessary, you can
re-position the compass to reduce deviation. If the standard cable is
not long enough, your Raymarine dealer can supply a 10 m (30 ft)
extension cable (part number: D174)
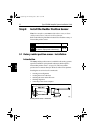
2. Connect the five cores of the cable to the
FLUXGATE terminals on
the course computer (as shown).
D
538
4-1
Vertical
81173_3.book Page 20 Thursday, June 7, 2001 11:51 AM