


Page 40 GPS chartplotters
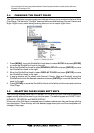
1. Press [MENU] and select USER POINTS.
2. Press [ENTER] or move the ShuttlePoint knob to the right and the MARK/WAYPOINTS
List page below will be shown.
3. To create a NEW Mark, move the ShuttlePoint knob to the right to
NEW MARK and
press [ENTER].
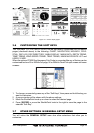
4. Press [ENTER] to change to show the Icon popup window.
5. Move the ShuttlePoint knob to highlight the desired Icon and press [ENTER].
6. Move the ShuttlePoint knob to the right to select the Mark name. Press [ENTER] an the
first digit in the name will be highlighted.
7. Move the ShuttlePoint knob up or down to select the first character.
8. Move the ShuttlePoint knob to the right to select the next character.
9. Repeat steps 4 and 5 until the Mark name is shown. Press [ENTER].
10. Move the ShuttlePoint knob to the right to select the Lat/Lon and press [ENTER].
11. Move the ShuttlePoint knob up or down to select the first character.
12. Move the ShuttlePoint knob to the right to select the next character.
13. Repeat steps 10 and 11 until the desired position is shown. Press [ENTER] and
[CLEAR], a WARNING “Save the new Mark?” popup window will be shown, move the
ShuttlePoint knob to the right or left to select
YES or NO and press [ENTER].
5.4 GOTO CURSOR
The GPS chartplotter allows you to quickly start navigating to the cursor, Mark or Route.
GOTO CURSOR
1. Move the ShuttlePoint knob to the exact position you what to navigate to.
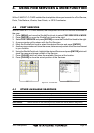
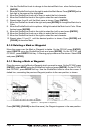
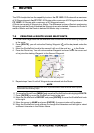
2. Press [GOTO] and a GOTO popup window will be shown
Figure 5.4 - GO TO menu
3. Using the ShuttlePoint knob select CURSOR and press [ENTER].
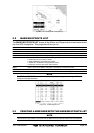
4. The chartplotter is now navigating from your current position to the location of the
chartplotter.
Figure 5.4a - Navigating to Cursor Example
5. Now the chartplotter shows a navigation line between the vessels location and the
destination point. A popup window shows the Distance (DST) and Bearing (BRG) from
the vessels location to the destination point.