


Portable Hot Oil Temperature Control Units Page 35
10. Remove the mechanical seal parts from the bracket.
11. Clean all parts thoroughly and examine for wear and damage. Check
lip seals, ball bearing, bushings and idler pin and replace if
necessary. Check all other parts for nicks, burrs, excessive wear and
replace if necessary.
Wash bearings in clean solvent. Blow out bearings with compressed
air. Do not allow bearings to spin; turn them slowly by hand.
Spinning bearings will damage race and balls. Make sure bearings
are clean, then lubricate with non-detergent SAE 30 weight oil and
check for roughness. Roughness can be determined by turning outer
race by hand.
12. Casing can be checked for wear or damage while mounted on
bracket.
Pump Assembly
The seal used in this pump is simple to install. If you take care during installation, good
performance will result.
The principle of the mechanical seal is to make contact between the rotary and stationary
members. These parts are lapped to a high finish, and their sealing effectiveness depends on
complete contact. When requesting special seal information, make sure that you give the
pump model number and serial number.
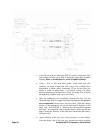
1. Install bracket bushing if required. If bracket bushing has a
lubrication groove, install bushing with groove at 12:00 o’clock
position in bracket. If carbon graphite, Refer to Installation of
Carbon Graphite Bushings.
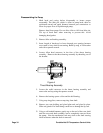
2. Coat shaft of rotor shaft assembly with non-detergent SAE 30 weight
oil. Start end of shaft in bracket bushing turning from right to left,
slowly pushing rotor in casing.