


Appendix C: RAID and Software Installation
C-5
4. The ACU allows you to use drives of different sizes in a RAID . However, during a
build operation, only the smaller drive can be selected as the source or fi rst drive.
5. When migrating from single volume to RAID 0, migrating from a larger drive to
a smaller drive is allowed. However, the destination drive must be at least half the
capacity of the source drive.
6. Adaptec does not recommend that you migrate or build an array on Windows
dynamic disks (volumes), as it will result in data loss.
Warning: Do not interrupt the creation of a RAID 0 using the Migrate option. If you
do, you will not be able to restart, or to recover the data that was on the source
drive.
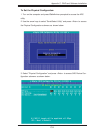
Adding a Bootable Array
To make an array bootable:
1. From the Main menu, select Manage Arrays.
2. From the List of Arrays, select the array you want to make bootable, and press
Ctrl+B.
3. Enter Y to create a bootable array when the following message is displayed: "This
will make all other existing bootable array non-bootable. Do you want to make this
array bootable? (Yes/No):" Then, a bootable array will be created. An asterisk will
appear next to the bootable array.
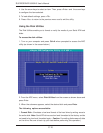
Deleting a Bootable Array
To delete a bootable array:
1. From the Main menu, select Manage Arrays.
2. From the List of Arrays, select the bootable array (*) you want to delete, and
press Ctrl+B. (* a bootable array is the array marked with an asterisk.)
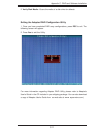
3. Enter Y to delete a bootable array when the following message is displayed:
"The array is already marked bootable. Do you want to make this array as not
bootable? (Yes/No):" Then, the bootable array will be deleted and the asterisk will
disappear.
Note: do not use the delete key to delete the bootable array.