


Chapter 2: Server Installation
2-9
2-6 Checking the Drive Bay Setup
Next, you should check to make sure the peripheral drives and the Serial ATA or
drives have been properly installed and all connections have been made.
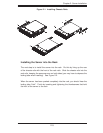
1. Accessing the drive bays
All drives are accessable from the front of the server. For servicing the DVD-ROM
and fl oppy drives, you will need to remove the top chassis cover. The SAS disk
drives can be installed and removed from the front of the chassis without removing
the top chassis cover.
2. DVD-ROM and fl oppy disk drives
A slim DVD-ROM and a fl oppy drive should be preinstalled in your server. Refer
to Chapter 6 if you need to reinstall a DVD-ROM and/or fl oppy disk drive to the
system.
3. Check the SAS drives
Depending upon your system's confi guration, your system may have one or more
drives already installed. If you need to install SAS drives, please refer to Chapter
6.
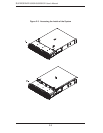
4. Check the airfl ow
Airfl ow is provided by three 8-cm center chassis cooling fans. The system compo-
nent layout was carefully designed to direct suffi cient cooling airfl ow to the compo-
nents that generate the most heat. Note that all power and data cables have been
routed in such a way that they do not block the airfl ow generated by the fans.
5. Supplying power to the system
The last thing you must do is to provide input power to the system. Plug the power
cord(s) from the power supply module(s) into a high-quality power strip that offers
protection from electrical noise and power surges. It is recommended that you use
an uninterruptible power supply (UPS).