


Chapter 6: Advanced Chassis Setup
6-3
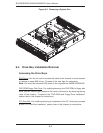
6-3 System Fans
Three 8-cm fans provide all the cooling needed for the SuperServer 6025B-3/6025B-
3R. It is very important that the chassis top cover is properly installed and making
a good seal in order for the cooling air to circulate properly through the chassis and
cool the components. See Figure 6-2.
System Fan Failure
Fan speed is controlled by system temperature via a BIOS setting. If a fan fails,
the remaining fans will ramp up to full speed and the overheat/fan fail LED on the
control panel will fl ash. Replace any failed fan at your earliest convenience with the
same type and model (the system can continue to run with a failed fan). Remove
the top chassis cover (see instructions in Chapter 2) while the system is still running
to determine which of the fans has failed.
The hot-plug fan will start to function upon connection to its fan header on the
serverboard.
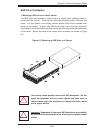
Replacing System Fans
1. Removing a fan
Remove the chassis cover. Press the tabs on the top of the fan housing and remove
the fan in its housing (see Figure 6-2). System power does not need to be shut
down since the fans are all hot-pluggable.
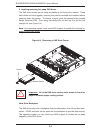
2. Installing a new fan
Replace the failed fan with an identical 8-cm, 12 volt fan (available from Supermicro,
p/n FAN-0070). Position the new fan at its proper place in the chassis by fi tting the
fan with its housing onto the fan mounts in the chassis. A "click" can be heard if
the fan (in its housing) is properly installed. If the system power is on, the hot-plug
feature will cause the fan to start immediately upon being connected to its header
on the serverboard.