


CAUTION
Defects caused by improper battery installation are not covered by
the warranty.
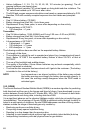
9.4.1. Transmitter battery kit
The transmitter battery kit includes a 3.0 V CR ½ AA lithium cell battery and a lubricated
O-ring. When handling the battery, do not make contact with both of the polesat thesame
time. Do not touch the metal surfaces of the battery with your bare fingers.
9.4.2. Required tools
•
A Phillips-head screwdriver
•
Soft cloth for cleaning
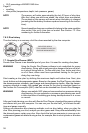
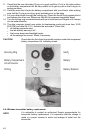
9.4.3. Replacing the transmitter battery
To change the transmitter battery:
1.
Remove the transmitter from the regulator HP port.
2.
Unscrew and remove the four Phillips screws on the back of the transmitter.
3.
Pull off the transmitter cover.
4.
Carefully remove the o-ring. Be careful not to damage the sealing surfaces.
5.
Carefully remove the battery. Do not touch the electrical contacts or the circuit board.
Check for any traces of leakage, or for any other damage. If there is a leak or any
other damage, take the transmitter to an authorized Suunto representative or distrib-
utor for checking and repair.
6.
Check the condition of the O-ring. A defective O-ring may indicate sealing or other
problems. Dispose of the old O-ring, even if it seems to be in good condition
7.
Check that the O-ring groove and the sealing surface of the cover are clean. Clean
them with a soft cloth if necessary.
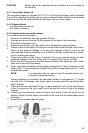
8.
Gently insert the new battery into the battery compartment. Check the polarity of the
battery. The "+" mark shouldpoint toward the top of thecompartment and the "-" mark
towards the bottom.
NOTE
It is imperative that you wait at least 30 seconds before re-in-
stalling the transmitter battery.
When the battery is re-installed, the transmitter sends an overpressure (“---“) signal
on code 12 for 10 seconds, after which it goes to normal operation, and shuts down
after 5 minutes.
9.
Check that the new lubricated O-ring is in good condition. Put it in the right position
in the O-ring groove. Be very careful not to get any dirt on the O-ring or its sealing
surfaces.
10.
Carefully put the transmitter cover into place. Note that the cover will only fit in one
position. Match the three slots on the inside of the cover with the three ledges below
the battery.
11.
Screw the four screws back into place.
45