


120 Appendix B Setup Example
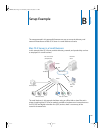
• An Open Directory master LDAP domain on the server centralizes user management,
including authentication of Mac OS X and Windows users.
• The ISP’s DNS service provides a domain name for the company (example.com).
• A DNS server running on Mac OS X Server provides name services for the server, the
printer, and any other intranet device that has a static IP address.
• A firewall between the server and the Internet protects the intranet from
unauthorized access.
• NAT service lets intranet users share the ISP’s IP address for Internet access, while VPN
lets employees access the intranet securely over the Internet when they’re working
away from the office.
• DHCP service on Mac OS X Server provides dynamic IP addresses to intranet client
computers. The server and printer have static addresses, but client computers have
dynamic addresses.
How to Set Up the Server
The following steps summarize how to set up Mac OS X Server in this hypothetical
small business. For complete information about setting up directory services, see the
Open Directory administration guide. For details about network service setup (IP
firewall, DHCP, and so forth), see the network services administration guide.
Step 1: Set up the network
1 Make sure the server has two Ethernet interfaces (ports), one for the intranet (LAN)
connection and one for the DSL modem connection. Use the faster interface for the
server connection. A 10-Mbit connection is more than sufficient for the DSL
connection.
2 Connect the server to the LAN using the faster interface. In this example, the server is
plugged in to a switch used to connect the existing client computers and shared
printer. We’ll refer to this interface as the “internal” interface.
Intranet devices should be connected to a hub or switch using good-quality CAT-5
Ethernet cables. A high-speed 10/100/1000 megabit switch would be able to support
advanced server features such as NetBoot that work best over a fast connection.
3 Connect the server to the DSL modem using the other Ethernet interface. We’ll refer to
this interface as the “external” interface.
Step 2: Set up the server and the master directory
1 Start the server from the first install disc. The procedure you use depends on the server
hardware.
In this example, assume the computer has a display, keyboard, and optical drive
attached. Turn on the computer, insert the first install disc into the optical drive, and
restart the computer while holding down the C key on the keyboard.
LL2343.Book Page 120 Thursday, August 14, 2003 5:12 PM