


Appendix B Setup Example 121
“Using Server Assistant to Install Remotely From the Install Discs” on page 83 tells you
how to start up other kinds of computers to install server software.
2 When the Installer opens, proceed through its panes by following the onscreen
instructions. If you need to format the target disk, see “Preparing Disks for Installing
Mac OS X Server” on page 81 for instructions.
Insert the second install disc when prompted.
When installation is complete, the server restarts and Server Assistant opens.
3 Fill out the worksheet on page 111. You’ll need the information as you move through
the Assistant’s panes.
4 Use the Language and Keyboard panes to select a server administration language.
5 In the Administrator Account pane, enter the server administrator’s names and
password. Click Continue.
6 In the Network Names pane, enter host, computer, and Rendezvous names for your
server. Click Continue.
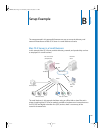
For this example, presume the host name is myserver.
7 Make sure the Network Interfaces pane lists your external and internal Ethernet
interfaces. If you need to add an interface, click Add.
Also make sure that the external interface is the first one listed in the Network
Interfaces pane. The first interface listed is the primary, or default, interface. VPN uses it
as the public network, treating all others listed as private.
Click Continue when both interfaces are listed.
8 The TCP/IP Connection pane appears for each Ethernet interface.
For the external interface, choose Manually from the Configure pop-up list, then enter
the IP address, subnet mask, and DNS server IP address, or addresses, provided to you
by the ISP. Click Continue.
For the internal interface, enter these values then click Continue:
Configure: Manually
IP Address:192.168.0.1 (192.168 values are reserved for internal LANs)
Subnet Mask: 255.255.0.0
Router: 192.168.0.1
DNS Servers: 192.168.0.1
LL2343.Book Page 121 Thursday, August 14, 2003 5:12 PM