


4
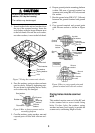
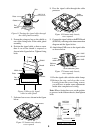
1. Loosen four scanner bolts to open the
scanner unit.
Refer to Figure 11 for location.
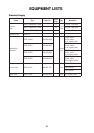
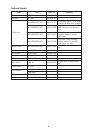
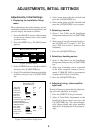
RF unit
Hex. bolt
M10X20 SUS
4 pcs.
Hex. bolt
M8X25 SUS
2 pcs.
Spring Washer
M10 SUS
4 pcs.
Cover
Pan head screw
M3X8 4 pcs.
Upper chassis
Square bushing
Lower chassis
Figure 10 Scanner unit chassis, upper
chassis separated
2. Unplug connector connected between up-
per and lower chassis.
3. Separate upper chassis from lower chas-
sis by removing two hex. bolts.
4. Remove cover by unfastening four pan
head screws.
5. Remove connector from RF unit.
6. Remove RF unit by unfastening four hex.
bolts.
7. Lay the corrosion-proof rubber mat (sup-
plied) on the mounting platform.
8. Fasten the lower chassis to the mounting
platform with hex. bolts, spring washers,
flat washers and nuts (local supply), and
then coat flat washers, spring washers, nuts
and exposed parts of bolts with silicone
sealant.
Cut a slit in rubber bushing to insert bolts.
Seal washers are not required.
9. Reassemble RF unit, cover and upper
chassis.
10.Set four knob caps (supplied) into outside
fixing holes.
11. Do steps 6-8 in “Outside fixing holes”.
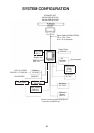
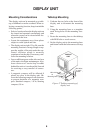
Connecting the Signal Cable
Only the signal cable runs from the display
unit to the scanner unit. In order to minimize
the chance of picking up electrical interfer-
ence, avoid where possible routing the signal
cable near other onboard electrical equipment.
Also, avoid running the cable in parallel with
power cables. Pass the cable through the hole
and apply sealing compound around the hole
for waterproofing.
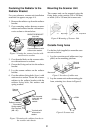
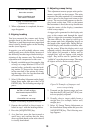
1. Open the scanner cover by loosening four
scanner bolts, and then fix the stay.
Stay
Cable gland
Scanner
Bolt
Figure 11 Scanner unit chassis,
cover opened
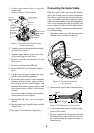
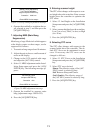
2. Fabricate the signal cable as shown below.
About
210 mm
Tubing
Vinyl
sheath
About 370 mm
Figure 12 Fabrication of signal cable
3. Unfasten the cable gland assembly (plate,
gasket, flat washer).
4. Pass the signal cable w/connector through
the bottom of the scanner unit chassis. Pass
the cable through the gland assembly as
shown below.