


9
ADJUSTMENTS, INITIAL SETTINGS
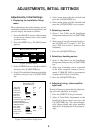
Adjustments, Initial Settings
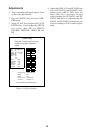
1. Displaying the Installation Setup
menu
Most adjustments and initial settings may be
completed on the Installation Setup menu, and
you can display this menu as follows:
1. Press the HM OFF control while turning
on the power. Release the control when
you hear a beep.
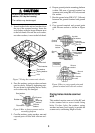
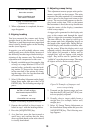
2. Press the [MENU] key. The MAIN menu
appears.
SSel by T-ball & press ENT.S
RINGS
INDEX
LINE
DISP
DATA
ARP-10
MENU
Change brill
from 3 to max.
INT
REJECT
OTHERS
MENU
Figure 20 Main menu
3. Select OTHERS menu with the trackball
and press the [ACQ/ENTER] key.
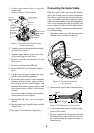
4. Select 23. Installation Setup menu with the
trackball and press the [ACQ/ENTER]
key.
Low
Mid
Hig
GPS
fa
˚F
Gyro
On
Stop
Std
Slave
All
m
˚C
Magnet
Off
Rotate
180˚~180˚
Sharp
Master
000001.5H
000000.0H
Gntl
LC
ft
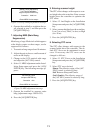
[Installation Setup]
Select item by T-ball
and press ENT key.
1. Nav Talker
2. Depth Unit
3. Temp Unit
4. Hdg Sensor
5. Key Beep
6. Ant on Tx
7. Dead Sector
8. Tune/Video Auto Adjustment
9. Heading Alignment
10. Sweep Timing Adjustment
11. MBS Adjustment
12. Ant Height
13. STC Curve
14. Oper Mode
15. Hours in Use
16. Tx Hours
Figure 21 Installation Setup menu
5. Select menu item with the trackball and
press the [ACQ/ENTER] key.
6. Select menu option with the trackball and
press the [ACQ/ENTER] key to register.
2. Selecting a navaid
1. Select 1. Nav Talker on the Installation
Setup menu and press the [ACQ/ENTER]
key.
2. Select type of navaid connected to the ra-
dar; All, GPS or LC (Loran C). “All” dis-
plays GPS and Loran C position data
alternately.
3. Press the [ACQ/ENTER] key.
3. Selecting a heading sensor
1. Select 4. Hdg Sensor on the Installation
Setup menu and press the [ACQ/ENTER]
key.
2. Select type of heading sensor connected
to the radar; magnetic compass (for ex-
ample, C-2000, PG-1000) or gyrocompass
(requires AD-10 Gyro Converter).
3. Press the [ACQ/ENTER] key.
4. Adjusting tuning, video amplifier
input level
Do the following to automatically adjust tun-
ing and video amplifier level input.
1. Press the [STBY/TX] key to transmit.
2. Select 8. Tune/Video Adjustment on the
Installation Setup menu and press the
[ACQ/ENTER] key. The unit automati-
cally adjusts tuning and video amplifier
input level, displaying the following mes-
sage: