


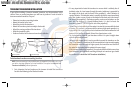

7
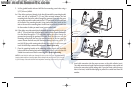
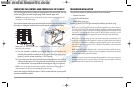
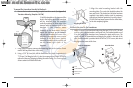
9. While holding cables in place in the cable collector insert, thread the cables
through the slot in the bottom of the cable collector cover, line up the cable
collector insert and cover, then slide the cover into place on the insert.
NOTE: Tab on cable collector insert goes into slot on cover.
10. Attach the cable collector insert to the cable collector cover using the 2 Phillip
screws provided.
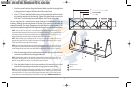
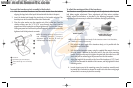
11. Place the control head back onto the mounting bracket. Plug in the cable collector
assembly to the back of the control head. Cable connectors and cable sockets are
keyed to prevent reverse installation, so be careful not to force the connectors
into the wrong sockets. Once the cable collector and all cables are plugged into
the back of the control head, lock the assembly into place by threading the
knurled screw into the threaded insert on the back of the housing. Adjust the
control head to the desired viewing angle and secure by tightening the gimbal
knobs.
NOTE: You may wish to dress the cabling with nylon wire ties in order to hold the cables
together and create a cleaner assembly.
The Humminbird® 900 Series™ control head is now ready for operation.
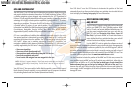
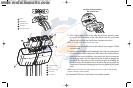
Plug Cable Connector Assembly to
Back of Control Head
Cable Collector Insert
1
Screws
2
Cable Collector Cover
3
Tab on Insert
4
Slot on Cover
5
1
2
3
Power
1
Temperature
2
Communications
3
Transducer
4
Cable Collector Insert
5
1
2 3 4
5
4
5
531374-1_A - 947 Man.qxd 2/15/2005 7:53 PM Page 12