


51
6 Starting The Saw
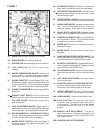
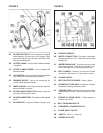
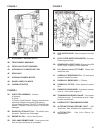
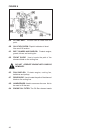
(See Figures 1, 2 and 5)
Always pay extreme care and attention to the
preparation of the machine before starting.
Remove all wrenches and tools from the
oor and the machine.
Always keep blade guard, belt guards and
fan guards in place.
• Follow all operating instructions and
warnings in this manual and on the machine.
• Close the Water Valve (1T).
• Mark the surface to be cut by drawing a line where
the cut is to be made.
• Pull out Handle Bars (1B) to desired length and tighten
Knobs (1A).
• Lower the Front Guide (6D) and align the Front Guide
(6D), Rear Guide (6F) and Diamond Blade (2E) with
the line on the surface.
• To start the saw when no water pressure is present,
set the Water Safety Switch (1L) to “0” (OFF).
• Set Speed Control Lever (1O) to the STOP (1BB)
position. Saw will not start unless the Speed Control
Lever (1O) is in the STOP (1BB) position. Check to
be certain the Transmission Bypass Valve (5M) is
closed in the down position.
• Set the Blade Clutch Switch (1V) to “0” (OFF) (if
equipped).
• Start the engine using the Engine Start Switch (1H).
Follow the procedure in the engine manual.
In Cold conditions, pre-heat the engine glow plugs by
hold in the Engine Start Switch (1H) for 15 seconds.
• Let the engine warm up for several minutes with
Engine Throttle (1F) at the low speed setting.
• When ready open the Water Valve (1T).
• Set Water Safety Switch (1L) to “1”(ON).
Test for adequate water supply. (2.5 - 5.0
GPM) (10 - 20 Liters per Min.) Low water ow
will cause damage to diamond blades.
• Pull Throttle (1F) out to set engine RPM at 3000.
See chart for the appropriate blade shaft and
engine speeds for specic blade sizes.
• Move the saw forward or reverse slowly by pushing
or pulling on the Speed Control Lever (1O). Move the
saw slowly to prevent stalling the blade. Make sure
the Front Guide (6D), Rear Guide (6F) and Diamond
Blade (2E) stay on the line.
• Set the Blade Clutch Switch (1V) to “1” (ON) to
engage the Blade Drive (if equipped) ONLY AT IDLE
SPEED OF ENGINE!
• Lower the saw by pressing the Raise/Lower Switch
(1P) on the Speed Control Lever (1O) downward until
the Diamond Blade (2E) is at the desired cutting depth
(See “Blade Cutting Depth Information”).
Be certain that water ow is abundant for
wet sawing.
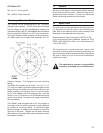
Blade Cutting Depth Information:
This saw is equipped with a Blade Depth Indicator (1Q)
which indicates the depth (in inches or cm) at which the
Diamond Blade (2E) is cutting. This saw also includes
a Blade Depth Stop Switch (1M) which stops the cutting
depth of the blade at a specied depth. The Blade Depth
Stop Switch (1M) can be switched to the release position
“0” when it is not required.
Use of the Blade Depth Indicator (1Q):
• Turn the Engine Start Switch (1H) to the “0” (OFF)
position to STOP the engine (If running).
• Turn the Engine Start Switch (1H) to the “1” (RUN)
position to power the electrical system.
• Lower the Diamond Blade (2E) by pushing the Toggle
Switch (1P) on the Control Lever (1O) downward until
the Diamond Blade (2E) touches the surface to be cut.
• Rotate the Blade Depth Indicator (1Q) to the left or
right until the Blade Depth Indicator (1Q) aligns to
the desired depth of cut. The uncut depth will now
be indicated by the numbers aligned to the Depth
Indicator (1Q) needle when the blade is lowered into
the cutting surface. See page 26.
• Raise the blade by pushing the Toggle Switch (1P)
on the Speed Control Lever (1O) upward until the
Diamond Blade (2E) is off of the cutting surface.
• Turn the Engine Start Switch (1H) to the OFF position
to turn off power to the electrical system.
Use of the Blade Depth Stop Switch (1M) (with the
engine running):
• Set the Blade Depth Stop Switch (1M) to the “0” (Off)
position to override the depth stop setting. Saw will
raise and lower over its full range without stopping.
• Set the Blade Depth Stop Switch (1M) to “1” (ON) to
activate the Blade Depth Stop feature. When lowering
the saw the Depth Indicator Dial (1Q) will trip a micro
switch and the saw will not lower any further producing
the desired depth of cut.
• Now the maximum cutting depth is set. If the saw
is raised out of the cut surface for any reason it can
now be lowered to this specied depth by lowering
the blade into the cutting surface with the Raise/Lower
(1P) on the Control Lever (1O).
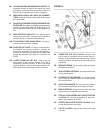
retaining bolt.
• Slip the Blade Shaft Wrench between the guard and
the belt guard onto the latch lever. Raise the lever to
unlatch and lift guard off spade.
To Install A SLIP-ON GUARD:
• Lower guard onto spade until latch engages.
• Install Bolt in rear of guard using the Blade Shaft