


15
PWR
S
ET
U
P
PA GE
C
L
E
AR
265
F
I
S
H
F
I
N
D
E
R
L265
Raymarine
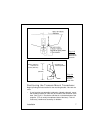
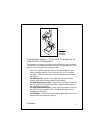
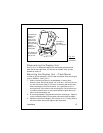
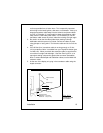
The angle of
the display
can be changed.
To release the
display from
the base,
press on the
right and left
sides until you
hear the clicks.
Slide the
display out of
the bracket.
The display can
be turned from
side to side.
Fig. 2-9
Installation
on Bracket
Dismounting the Display Unit
See Fig. 2-9. To release the display from the bracket, press and hold
down the left and right sides. You will hear an audible “click,” and the
bracket will slide out.
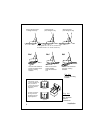
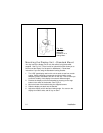
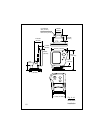
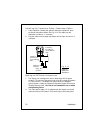
Mounting the Display Unit – Flush Mount
In order to do this installation, you will need the optional flush mounting kit
(part no. M78931). See Fig. 2-11.
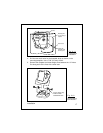
1. Select a mounting location on the dashboard or control panel.
Choose a clear, flat area at least 6" x 6" (152 mm x 152 mm). Be sure
you will also have at least 6" (152 mm) of clearance behind the area
where the display unit will be mounted. It is a good idea to drill a
small pilot hole in the center of the mounting area. Be sure there are
no hidden electrical wires or other items behind the point where you
plan to mount the display unit.
2. A mounting template is supplied with the flush mounting kit. Tape this
over the selected location on the panel and trace around the edges.
3. Make the cutout for the display. Drill a series of 1/2" (13 mm) holes at
the points shown around the edges of the cutout area.
Installation