1-18
PCS-1/1P
Item
General Setup
Audio Setup
Contents of setting
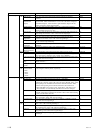
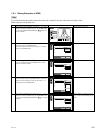
Enter the terminal name to be notified to MCU.
Set to “On” when using a dual monitor function with the two monitors
connected.
Select whether a signal should be output to the monitor connected to which
output terminal. When “Dual Monitor” is set to “On”, the menu is changed to
“Sub-Monitor Output”. Select whether a signal should be output to the sub-
monitor connected to which output terminal.
Set to “On” when using the standby mode. Set to “Off” when not using it.
Set the time (1 to 99 minutes) required until the unit is put into the standby mode
when the standby mode is set to “On”.
Set to “On” when displaying the elapsed time in the upper-right position of the
screen during the conference. Set to “Off” when not displaying it.
Set the current date and time.
Set to “On” when registering the remote user in the Phone Book after a
conference is terminated. Set to “Off” when not registering it.
Enter the IP address of the computer used when the data conference conforming
to T.120 is made using NetMeeting.
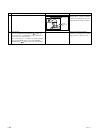
Select whether to attach the optional mimio Xi vertically or horizontally on the
whiteboard.
Select the size (height x width) of the whiteboard used.
Select whether to display the whiteboard size in inches or meters.
Select the language of the menu and message displayed on the screen.
Select the mode for putting the monitor into the standby state or turning on the
power when a Sony’s monitor is used. Usually, set to “MODE 1”.
Set to “On” when receiving the camera control command from the remote party.
Set to “Off” when not receiving it.
Select whether to display the balloon help appearing when entering characters or
numeric characters.
Execute the format of the Memory Stick.
The input device names displayed in a launcher menu or video input select menu
can be changed to arbitrary names, respectively.
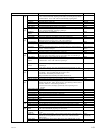
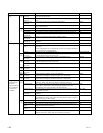
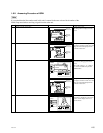
Select the audio input (MIC, AUX, or MIC + AUX).
Select the microphone used (Internal, External, or DSB MIC).
Select whether to use communication transducer CTE-600 and select the input
terminal to be connected. Select “Off” when not using CTE-600. Select “AUX”
when inputting to the AUDIO IN terminal of the main unit and select “DSB
AUX IN” when inputting to the AUX IN terminal of a data solution box.
* When CTE-600 is set so that it is used, “Input Select”, “Mic Select”, and
“Echo Canceller” are automatically determined and cannot be changed.
Select “Internal” when using the echo canceller of the main unit and select
“External” when using an external echo canceller. Select “Off” when not using
the echo canceller of the main unit.
Select “On” when using a lip sync function that synchronizes the lip motion and
voice of a speaker. Select “Off” when not using it.
Set to “On” when outputting a voice to the AUDIO OUT (MIXED) terminal.
Set to “Off” when not outputting it.
Set to “On” when generating a beep sound during pressing of a remote controller
button. Set to “Off” when not generating it.
Set to “On” when generating an effect sound during system start up, conference
start, conference end. Set to “Off” when not generating it.
Set to “On” when generating a ring-back tone during dialing or a busy tone
during talking. Set to “Off” when not generating it.
Set to “On” when generating a ringer tone during calling. Set to “Off” when not
generating it.
Page
1/4
Page
2/4
Page
3/4
Page
4/4
Page
1/2
Page
2/2
Initial value
PCS-1
Off★
VIDEO OUT★
Off
On
On
Blank
Vertical
3’0”x4’0”
Inches
English★
MODE1
On
On
All blanks
MIC
Internal
Off
Internal
Off
On
On
On
On
On
Terminal Name
Dual Monitor
Monitor Output
(Sub-Monitor
Output)
Standby Mode
Standby Time
Time Display
Clock Set
Last Number
Registration
T.120 PC Address
Whiteboard
Attachment
Whiteboard Size
Whiteboard
Measurement Size
Language
IR Repeater Mode
Control by Far End
Character Input
Help
Memory Stick
Format
Video Input
Selection Name
. Main
. Object
. AUX1
. AUX2
Input Select
Mic Selection
CTE
Echo Canceller
Lip Sync
Recording Mute
Beep Sound
Sound Effect
Dial Tone
Ringer Tone


