


Installation & User Manual
Ed 19UK June 2013
Page 22 of 28
Testing and Recalibrating
Please observe that testing and recalibration of sensors mounted in hazardous arias shall be
carried out of Ex qualified personnel.
Testing
Before dispatch, the MAS2600 transmitter is calibrated in accordance with the requirements
specified in the order.
The transducer and the amplifier are calibrated together and must, therefore, always be used
together.
A programmable measuring range transmitter will in conditions of no pressure (empty tank) give
an output signal of 4 mA, and in conditions of maximum pressure (full tank) an output signal of
20 mA.
The transmitter should be tested by applying to the transducer a known pressure from a calibrator
and reading the equivalent milliamp signal on a milliamp meter.
The above-mentioned applies to the gauges transmitter only. For absolute transmitters the output
signal will be higher than 4 mA, because it is calibrated for 4 mA at 0.8 bar abs. The output
signal will typically be 5-7.5 mA in atmospheric pressure, depending on the transducer range and
the actual atmospheric pressure. Maximum output signal 20 mA, will be at the transducers
absolute range.
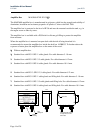
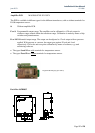
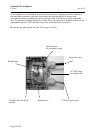
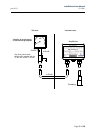
Recalibrating Gauge Transmitter using Test Cup type G022S100
When recalibrating the MAS2600 Gauge Transmitter a pressure calibrator with a range of
-1 to 3.5 bar should be used. It should have an accuracy of 0.05% FS or better, as well as a 4½
digit milliamp meter.
1. Set the calibrator to pressure mode.
2. Connect the pressure calibrator to the transducer via MAS2600 Test Cup, type G022S100.
3. Check that the range select switch on the amplifier is correctly set.
4. In conditions of no pressure (atmospheric pressure) the output signal should be adjusted to
4.00 mA on the zero potentiometer.
5. Increase the pressure to maximum and adjust the output signal to 20.00 mA on the span
potentiometer.
6. Remove the pressure and check the zero point
7. Check the linearity at 0-25-50-75 and 100% of the measuring range.
8. If necessary, repeat the steps 4 to 7.