


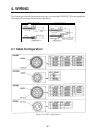

3-5
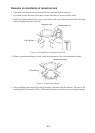
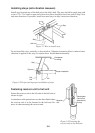
Installing hull unit on retraction tank
After welding the retraction tank and allowing sufficient time for cooling, install the hull unit as
follows:
1. Clean the O-ring and O-ring groove and coat them with a slight amount of grease. Place the
O-ring in position on the tank flange.
2. Lay the gasket (1) on the top of the tank flange.
3. Orient the hull unit so that the arrow on its flange points toward the ship’s bow.
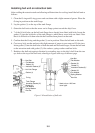
4. 7 of the 16 bolt holes on the hull unit flange have already been fitted with bolts. Insert the
gasket (2) into the bolt holes of the tank flange to which these seven bolts are fitted. Note
that it is difficult to fit them after the hull unit has been placed on the tank.
5. Confirm that the O-ring and the gasket (1) are in position. Place the hull unit on the tank.
6. Coat every bolt, washer and nut with slight amount of grease to ease removal. Fit the insu-
lation gasket (2) into the bolt holes of both the tank and hull unit flanges. Fasten the hull unit
to the retraction tank with gasket (2), flat washers, spring washers and hex bolts.
7. Reinforce the hull unit against vibration by extending stays to the ship’s hull from the two
eye bolts at the top of the hull unit, referring to figure at the top of the next page.
Hex Bolt
Insulation Gasket (2)
Hex Nut
Hex Nut
Hex Nut
* Used only on 1200 mm
travel type.
Gasket (1)
Flat Washer
Gasket (2)*
Insulation Gasket (2)*
Gasket (2)*
Flat Washer
Spring Washer
Flat Washer
Gasket (2)*
Hull Unit Flange
Gasket (1)
O-ring
Tank Flange
Insulation Gasket (2)*
Gasket (2)*
Flat Washer
Spring Washer
*
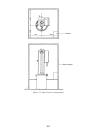
Figure 3-6 Installation of hull unit