


TK-7100
6
4-1. Adding the data password.
If the data password is set in the optional feature menu,
you must enter the password (Master transceiver) to activate
a clone mode.
You can use 1, 2, 3, and 4 to configure the password. The
maximum length of the password is 6 digits.
1. [CH DOWN]+Power ON.
2. “CLN LOCK” is displayed on the LCD.
3. Enter the password using 1 : [MON] key, 2 : [SCN] key, 3 :
[
] key and 4 : [ ] key.
4. Press [CH DOWN] key.
5. If the password matches, the transceiver enters a clone
mode and “ CLONE ” is displayed. Otherwise, trans-
ceiver beeps and returns to the password input mode.
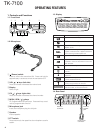
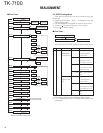
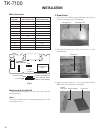
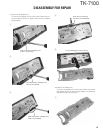
Clone cable
(E30-3382-05)
Fig. 2
Press [CH DOWN] key+Power ON for 2 seconds
Is data
password
set?
Yes
No
Shows CLN LOCK
Input passward if
passward is correct
Clone mode
[MON]
Start the clone function
5-2. Adding the Data Password
If the data password is set in the optional feature menu,
you must enter the password to activate a self programming
mode.
You can use 1, 2, 3 and 4 to configure the password. The
maximum length of the password is 6 digits.
1. [MON]+Power ON.
2. “SELFLOCK” is displayed on the LCD.
3. Enter the password using 1 : [MON] key, 2 : [SCN] key, 3 :
[
] key and 4 : [ ] key.
4. Press [CH DOWN] key.
5. If the password matches, the transceiver enters a self pro-
gramming mode and “ SELF ” is displayed. Otherwise,
transceiver beeps and returns to the password input
mode.
Note :
This mode (self programming mode) cannot be set when
it has been disabled with the FPU.
5-3. Channel Setting Mode
Each channel can be setup in its action mode by using the
panel keys.
• Pressing [MON] when “ SELF ” is displayed, sets chan-
nel setting mode.
• Select an item set using [ ] then change the selection
with the [CH UP] or [CH DOWN].
• The data displayed using [SCN] is stored in the memory
and then proceeds to the next item.
• Pressing [
] proceeds to the next item without storing it
in the memory.
• Press [MON] to set the display to “ SELF ” and return to
reset (default) status.
The setup items for channel setting mode are listed be-
low.
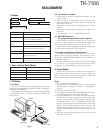
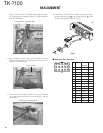
No.
Function
Choices Display Remarks
Select 1~64 key :
Group/Channel
channel selection
Select 1~8 key :
Group/Channel
group selection
1RX Step 2.5kHz~ Display when an item
frequency
1MHz is selected or a step is
changed (about 0.5
seconds).
key : Select the
frequency step
Blank key : Hold 1 second
100.0000~ to frequency on/blank
550.0000MHz switching.
The right most dot
indicates 50Hz digit.
(On=5, Off=0)
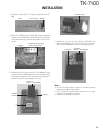
5. Self Programming Mode
Write mode for frequency data and signalling, etc. To be
used ONLY by the authorized service person maintaining the
user’s equipment. After programming, reset the FPU to the
“Self- Programming” disabled mode. Radios CANNOT be
delivered to the end-user in the self-programming mode.
5-1. Enter to the Self Programming Mode
Hold down the [MON] key and turn the power switch on.
When enter the self programming mode, “ SELF ” is dis-
played.
■ Flow Chart (Master radio)
REALIGNMENT
1– 1.
1– 64.
1 .–1
8 .–1
STP 250
STP 1M
R .–––––––
R.150.0000