


6-4
A+ SERVER 2022G-URF User's Manual
Warning! Enterprise level hard disk drives are recommended for use in Supermicro
chassis and servers. For information on recommended HDDs, visit the Supermicro
Web site at http://www.supermicro.com/products/nfo/files/storage/SAS-1-
CompList-110909.pdf
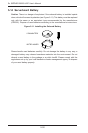
Replacing System Fans
Removing a Fan
1. Remove the chassis cover.
2. Press the tabs on the sides of the fan to unlock and remove the fan and its
housing. The fan's power connections will automatically detach.
3. System power does not need to be shut down since the fans are hot-
pluggable.
Installing a New Fan
1. Replace the failed fan with an identical 8-cm, 12 volt fan (available from
Supermicro, p/n FAN-0094L4).
2. Position the new fan into the space vacated by the failed fan previously
removed. A "click" can be heard when the fan is fully installed in place and
the power connections are made.
3. If the system power is on, the hot-plug feature will cause the fan to start
immediately upon being connected to its header on the serverboard.
6-4 Drive Bay Installation/Removal
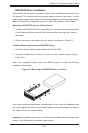
Accessing the Drive Bays
SAS/SATA Drives: You do not need to access the inside of the chassis or remove
power to replace or swap SAS/SATA drives. Proceed to the next step for instructions.
You must use standard 1" high, SAS/SATA drives in the system.
Note: Refer to the following ftp site for setup guidelines: <ftp://ftp.supermicro.com/
driver/SAS/LSI/LSI_SAS_EmbMRAID_SWUG.pdf> and Supermicro's web site for
additional inmformation < http://www.supermicro.com/support/manuals/>.
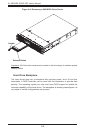
DVD-ROM: For installing/removing the DVD-ROM drive, you will need to gain
access to the inside of the server by removing the top cover of the chassis. Proceed
to the "DVD-ROM Installation" section later in this chapter for instructions.