


110
Tip:
Another quick way to stop recording one trail and begin a new one
is to use the New Trail command. Press
MENU|MENU|↓ to MY
TRAILS|ENT|ENT.
Caution:
You also have the option of completely turning off trail record-
ing, under the trail Options command. If, however, the Update
Active Trail option is left turned off, it will cancel the automatic
trail creation feature.
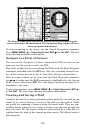
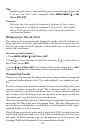
Displaying a Saved Trail
The active trail is automatically displayed on the with the default set-
tings. You can selectively turn trail display off and on for any saved or
active trail. In the Saved Trails List, visible trails have a check mark in
front of the trail name.
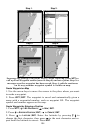
To turn off trail display:
1. Press
MENU|MENU|↓ to MY TRAILS|ENT.
2. Press ↓ to enter the Saved Trail list, then use ↑ ↓ to select the de-
sired Trail Name|
ENT.
3. Press ↓ → to
VISIBLE|ENT. To return to the previous page, press EXIT
repeatedly. Repeat the steps above to the turn on the trail display.
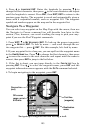
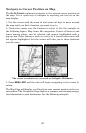
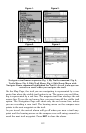
Navigating Trails
There are three methods for following a trail: visual trailing, navigating
a trail and backtracking a trail. Try each method to see which you pre-
fer.
Visual trailing is the simplest method. It uses only the Map Page and
requires no menu commands at all. The technique works the same if
you are running a trail forward (from start to end) or backward (from
end to start.) Visual trailing, however, provides no navigation informa-
tion during the trip, like time to your destination.
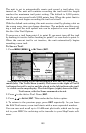
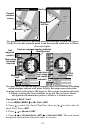
The other two methods provide a full range of navigation data and work
with both the Map Page and Navigation Page. The only difference be-
tween them is navigating a trail follows a trail forward while back-
tracking follows a trail in reverse.
When hiking at walking speed with a hand-held GPS, we often just use
visual back trailing because it is a bit better at following each turn on a
foot path. At faster speeds, like on the highway or on the water, the
Navigate Trail and Backtrack Trail commands are handy.