111
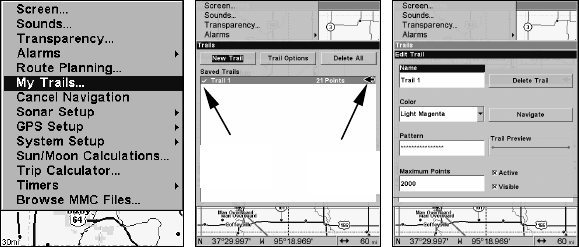
Sequence for saving a trail and beginning a new one. My Trails com-
mand (left). The Trails Menu (center). The arrow to the right of Trail 3
indicates the trail is active and the check to the left indicates the trail
is visible on the map display. The third figure (right) shows the Edit
Trail menu, with the Name command selected.
To Save a Trail
1. Press
MENU|MENU|↓ to MY TRAILS|ENT.
2. Press ↓ to the Active Trail Name|
ENT.
3. Press ↓ → to
ACTIVE|ENT. This unchecks the Active option.
4. To return to the previous page, press
EXIT repeatedly. As you leave
the Edit Trail menu, a new trail starts with a new sequential number.
You can save and recall up to 10 different plot trails, which can be cop-
ied to your MMC for archiving or for transfer to your MapCreate soft-
ware.
Tip:
Another quick way to stop recording one trail and begin a new one
is to use the New Trail command. Press
MENU|MENU|↓ to MY
TRAILS|ENT|ENT.
Caution:
You also have the option of completely turning off trail record-
ing, under the trail Options command. If, however, the Update
Active Trail option is left turned off, it will cancel the automatic
trail creation feature.
Displaying a Saved Trail
The active trail is automatically displayed on the with the default set-
tings. You can selectively turn trail display off and on for any saved or
active trail. In the Saved Trails List, visible trails have a check mark in
front of the trail name.
Active
symbol
Visible
symbol


