


26 GHP 10 Marine Autopilot System Installation Instructions
2. Planing RPM: Take note of the RPM reading from the tachometer on the dashboard of your boat at the point your boat transitions
from displacement to planing speed. If the tachometer value does not match the value on the GHC 10, use the arrows to adjust the
value. When you are nished, select Done.
3. Calibrate Compass: Follow the directions on the GHC 10. Drive your boat in a straight line, and select Begin when you are
ready. When instructed, turn the boat slowly, taking care to make as steady and at a turn as possible. On a dual engine boat,
run the port engine forward and the starboard engine in reverse to pivot on a stationary position. After you successfully complete
the calibration, the GHC 10 displays a completion message; select Done. If the calibration fails, select Retry to begin the process
again.
4. Autotune: The Autotune conguration adjusts feedback gains. Follow the directions on the GHC 10. Drive your boat in a straight
line, at a constant RPM below planing speed, and select Begin when you are ready. The boat will perform a number of zigzag
motions while the Autotuning is in progress. When the GHC 10 displays a completion message, select Done. Be sure to take
manual control of the boat when Autotuning is complete. If the Autotuning fails, select Retry to begin the process again.
5. Set North: To perform this step, you must have a large stretch of open water available. Be sure to have at least 45 seconds of
hazard-free, open water available while at planing speed. Drive the boat in a straight line, at planing speed, and select Begin when
you are ready. When the GHC 10 displays a completion message, select Done. If the calibration fails, select Retry to begin the
process again.
Manually Running the Dockside and Sea Trial Wizards
The Dockside Wizard and the Sea Trial Wizard allow you to quickly dene all of the important conguration settings on the GHP 10.
If, after running the wizards, you do not feel as though the GHP 10 is working correctly, you can run the wizards again at any time. To
access the wizards, power the GHC 10 on using the advanced conguration power-on procedure.
To manually run the Dockside Wizard:
1. From the Heading screen, select Menu > Setup > Dealer Autopilot Conguration > Wizards > Dockside Wizard.
2. Perform the steps as prompted. For more information, see page 25.
To manually run the Sea Trial Wizard:
1. From the Heading screen, select Menu > Setup > Dealer Autopilot Conguration > Wizards > Sea Trial Wizard.
2. Perform the steps as prompted. For more information, see page 25.
Changing Advanced Conguration Settings
You can run the Autotune automated conguration process, calibrate the compass, and dene north on the GHP 10 through the
GHC 10 without running the wizards. Additionally, without running the wizards, you can individually dene each conguration
setting. To access the automated conguration settings and the advanced conguration settings, power the GHC 10 on using the
advanced conguration power-on procedure
To manually run the automated conguration settings:
1. From the Heading screen, select Menu > Setup > Dealer Autopilot Conguration > Automated Setup.
2. Select Autotune, Calibrate Compass, or Set North.
3. Perform the steps as prompted. For more information on each automated conguration setting, see page 25.
To manually dene individual conguration settings:
1. From the Heading screen, select Menu > Setup > Dealer Autopilot Conguration.
2. Select the appropriate category of setting you want to congure.
3. Select the setting you want to congure.
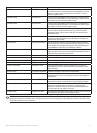
Category Setting Description
Tachometer Setup Verify Tachometer With the engine (or engines) running, compare the RPM readings on the
GHC 10 with the tachometer on the dashboard of your boat. Adjust the
Pulses Per Rev with the arrows if the values do not match, and then
select Done. When you adjust the Pulses Per Rev with the arrows, there
is a delay before the new RPM readings appear on the GHC 10. For each
adjustment, be sure to wait until the GHC 10 adjusts to the new reading.
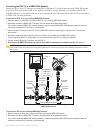
Tachometer Setup RPM Source Select the engine (or engines) to which you wired the tachometer sensor
from the CCU. If you connected a NMEA 2000-compatible engine to the
NMEA 2000 network, select NMEA 2000. For a single-engine boat, select
port.