


English
13
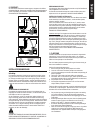
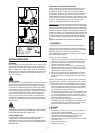
LONG AS THE OPERATION HAS BEEN COMPLETED, since if you
let it go, it might fall inside the pump.
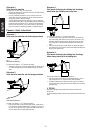
• Unscrew the seal assembly and slide it off the piston.
• Wrap one turn of tape around the thread at the top of the piston
rod to protect the new seal, slide the new seal down the piston rod
and tighten it.
• Remove the tape from the thread.
• Replace the bumper washer and the handle, absolutely by gripping
the piston rod through the tape.
• Remove the tape from the piston rod.
3 Winterization
Drain the complete system both as a protection against frost damage
and to avoid the growth in the pipework of bacteria that could cause
unpleasant smells.
HAZARD RISK: SEACOCKS OPENED BY MISTAKE. In case you leave
the toilet disassembled and if the sea cocks are opened when the boat
isaoat,waterwilloodinbycausingthesinkingoftheboatandthe
possible loss of life. Therefore, it is indispensable to attach a warn-
ing notice to the seacocks and, if possible, wire the seacocks shut.
REMEMBER TO ATTACH WARNING NOTICES!
Warning: THE USE OF ANTI-FREEZE IS NOT RECOMMENDED, as it
is not possible to ensure that the product penetrates the whole toilet
system If, for any reason, an anti-freeze compound is employed it will
have to be a glycol-based one.
• Open any secondary valve.
• Remove the base drain plug.
• Loosen hose clips and disconnect all the hose ends from the
seacock hose tails, the hose toilet tails, and any secondary valves.
• Pump the handle to drain the toilet pump and ensure that all water
is properly drained from the toilet system.
If you not are going to disassemble the toilet:
• Reconnect all hose ends and secure them with their hose clips.
• Firmly replace the base drain plug.
• Fasten down seat, lid and pump handle to prevent any use, and
attach a warning notice.
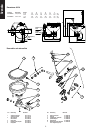
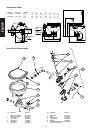
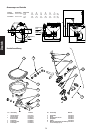
4 Overhaul
You need a service kit containing all wearing parts refer to the list of
parts for further details.
CAUTION
FOR THE SAFETY OF YOUR CRAFT AND YOUR CREW, USE ONLY
GENUINE SPARE PARTS.
Remove the pump assembly as follows:
• Loosen hose clips; disconnect the inlet hose and the link hose
from the top of the pump.
• Removethe2screwswhichsecurethedischargeangeand
elbow to the pump cylinder.
• DO NOT remove the hose clips and hose from the discharge
elbow.
• Remove the 4 screws which secure the pump cylinder to the base.
• Lift off the pump assembly and pick up the bottom valve gasket
and the joker valve.
Dismantle the Pump assembly as follows:
• Remove the 6 screws that secure the valve cover.
• Opentheushcontrolbeforeliftingoffthevalvecoverassembly
and picking up the top valve gasket and the valve seat.
Reassemble the pump as follows:
• Push on the new piston O-ring.
• Followtheservicinginstructionsforsealreplacementandtthe
new seal assembly, the piston assembly and the handle.
• Lubricate pump cylinder bore with Vaseline.
• Locate the valve seat on cylinder top, locate the top valve gasket
onitspegsonthecylindertopandopentheushcontrolbefore
rettingthevalvecover.
Ret Pump assembly on the toilet as follows:
• Locate the bottom valve gasket on its pegs on the base and locate
the joker valve in the discharge elbow.
• Securethedischargeangetothepumpcylinderbeforesecuring
the cylinder to the base.
• Examine all hoses throughout their length for chafe, kinks and
splits under hose clips, check all hose clips for corrosion and
replace worn out or damaged parts .
• Reconnect all hose ends and secure them with their hose clips.
• Ensure that the base drain plug is securely tightened.
Do not lubricate the top or bottom valve gaskets, and do not apply
sealing compounds to any gasket or hose connections.