


English
9
Applications
Johnson Pump Comfort and Compact bowl manually operated marine
toilets can be installed in both power and sailing craft, either above or
below the waterline, for use on sea, river, lake or canal.
The waste can be discharged either overboard (please have in mind
national or local restrictions), or into a treatment system or into an
on-board holding tank.
Note: Johnson Pump manual toilets are designed specically for
marine use. Consult your Johnson Pump retailer for advice about
possible non-marine applications.
Features
Design
• Flexible hole pattern on the base, for easy substitution with the
most common toilets on the market
• Reversible pump mounting allows re-assembly for left hand
operation by installer
• Self-priming, double acting piston pump
• Piston rod guide in brass for increased service life
• Strongswirlactionforefcientushing
• Smooth design for easy cleaning
• Ergonomic handle
• Spring assisted top valve closure for easier priming
• Constant 38mm (1 1/2") bore waste path minimizes blockages
• Doublecheck-valvesatfull38mm(11/2")borepreventbackow
• Multi-angle outlet for various installations
• Accessible mounting points for faster installation
• Standard fastenings, logic located, no need for special tools
• Double sealed base plug for winter drain and easy cleaning
access
Material
• Premium baked enamel painted wooden seat and cover
• Hygienic white ceramic bowl for ease of cleaning
• Pump and base moulded in ABS or polypropylene, stainless steel
fastenings, brass weights and neoprene seals and gaskets
Performance
• Self priming, dry, height 1m (3ft)
• Discharge height 3m (9ft)
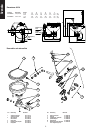
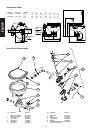
Dimensions
• Dimensional Drawing on the page x.
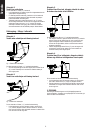
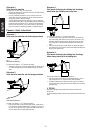
Installation instructions, General
Through hull ttings:
You need:
19mm.(3/4”)boreseacockfortheushingwaterinletand,ifyouare
discharging overboard, a 38 mm. (1 1/2”) bore seacock for the waste
outlet.
• Keep to the seacock manufacturer’s instructions concerning
materials and methods of installation
• Ensure that the inlet seacock is positioned where it will be below
the waterline at all times when the craft is under way and also
ensure that any outlet seacock is both aft of, and higher than the
inlet seacock
Pipework -selection of the correct method:
You must select the correct installation method for the inlet pipework
from 2 possibilities and for the outlet pipework from 4 possibilities,
according to whether the toilet is above or below the waterline and to
whether it discharges the waste overboard or into an on-board holding
tank.
General instructions for all possible installations
You need:
• Spiralreinforcedsmoothboreexiblehoseforboththe19mm.
(3/4") internal diameter inlet and the 38 mm (1 1/2") internal
diameter outlet hose
• Stainless steel hose clip
• secure the hose runs so that the hoses cannot move, nor exert
anyleverageactiononthehosetailttingstowhichtheyare
connected, as this may cause adjacent joints to leak.
• avoid sharp bends in the hoses since this might cause them to
become kinked
• keep all pipework lengths as short as possible while you are
carrying out these operations Unnecessary inlet or outlet hose
lengths just make the toilet harder to pump.
Tip:Shoulditbedifculttotthehoseontothehosetailsofthetoilet
or the sea cocks, soften the hose by dipping its end in hot water
CAUTION:
• DO NOT APPLY FLAME TO HOSES
• DO NOT APPLY FLAME OR HEAT TO THE PLASTIC HOSE
TAILS OF THE TOILET
• DO NOT APPLY SEALING COMPOUNDS TO ANY HOSE
CONNECTION
• Secure all hose ends to the hose tails with preferably two stainless
steel clips, ensuring that all inlet connections are airtight and that
all outlet connections are watertight.
• The discharge elbow may be rotated 360 deg. to suit your in-
stallation. Always slacken the 2 securing screws, adjust the
discharge elbow to the required position and retighten the 2
securing screws before connecting the hose to it
CAUTION:
FAILURE TO FOLLOW THIS PROCEDURE MAY CAUSE LEAKS BE-
TWEEN THE ELBOW AND THE PUMP CYLINDER
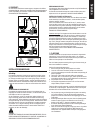
Pipework – Inlet, 2 alternatives
Alternative 1:
Toilet below the waterline
Youmustusea19mm(3/4”)VentedLooptting.
• Run the inlet hose by the most direct way from the inlet seacock
totheushingpumpinlettail.
• Remove the white hose supplied with the toilet which connects
theushingpumpoutlettailtothebowlelbow
• Using a spanner, rotate the intake seal so that the elbow points
upwards
• Replace the white hose with a longer length of 19 mm internal
diameter hose and position it in a way that its point is at least
20cm(8”)abovethehighestpossiblewaterlineandtthevented
loop at that highest point
CAUTION:
DO NOT POSITION THE VENTED LOOP BETWEEN THE INLET SEA-
COCKANDTHEFLUSHINGPUMPINLET,asitwillmaketheushing
pumpdifcultorhardertoprime,andcouldpreventitfromworkingat
all.
Johnson Pump Marine Toilet, Manual