


Installing the HI400
21
7. Insert the other end of the negative (–) cable into the
negative (–) terminal on the HI400 and tighten the
terminal screw. Ensure all strands of wire are inside the
connector (no stray strands). The terminal manufacturer’s
recommended tightening torque is 21 inch-pounds.
8. Attach the positive (+) cable to the breaker or fuse and
disconnect combination installed on the battery positive
(+) terminal in step 5. Tighten the connection according
to the manufacturer’s recommendations.
9. Insert the other end of the positive (+) cable into the
positive (+) terminal on the HI400 and tighten the
terminal screw. Ensure all strands of wire are inside the
connector (no stray strands). The terminal manufacturer’s
recommended tightening torque is 21 inch-pounds.
10. Verify the polarity of the DC connections is correct:
positive (+) on the inverter connected to the positive (+)
on the battery, and negative (–) connected to the
negative (–).
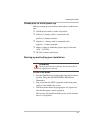
When you are ready to operate the inverter, close the DC
circuit breaker or disconnect switch to supply DC power
to the inverter.
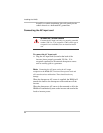
Connecting the DC ground
The chassis ground lug on the DC end of the inverter is used
to connect the chassis of the inverter to your system’s DC
grounding point as required by installation codes for some
installations.
Use copper wire that is either bare or provided with green
insulation. Do not use the DC ground lug for your AC output
grounding wire (see the AC wiring instructions on page 12 in
this section).
To connect the DC ground:
➢ Connect a No. 8 AWG copper wire between the HI400’s
chassis ground lug and the DC grounding point for your
system.