


34 GHP 10 Marine Autopilot System Installation Instructions
2. Connect the black wire (-) to the negative (-) side of the battery rst.
3. Connect the red wire (+) to the positive (+) side of the battery next.
4. Connect the ECU power cable to the ECU last.
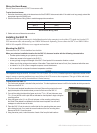
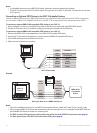
To connect the data cable to the GHC 10, align the notches on the cable plug and on the back of the GHC 10. Insert the cable into
the connector, and turn the locking ring clockwise until it stops.
NOTE: After the ECU and the GHC 10 are connected to power, the GHP 10 autopilot system and the NMEA 2000 network can be
powered on.
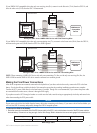
Bleeding the Hydraulic Steering System
Air must be purged completely from all the hydraulic lines, the helms, the cylinders, the pump, and the Shadow Drive for the system
to function. If the hydraulic system is not bled, then the GHP 10 autopilot system will not work correctly. Follow the instructions
provided by the manufacturer of your steering system to properly bleed the hydraulic system on your boat. Treat the pump as
the lowest helm when bleeding the system.
Notes:
Disable the Shadow Drive from the GHC 10 to make the bleeding process easier. On the GHC 10, select Menu > Setup >
Autopilot Conguration > Hydraulic Setup > Shadow Drive Enable. Change the Shadow Drive Enable setting to Disable.
Remember to enable the Shadow Drive after the bleeding process is complete.
To completely bleed the hydraulic system, it may be necessary to drive the autopilot pump in both directions to remove any air
trapped within the pump. You can do this during the Verify Steering Direction portion of the Dockside Wizard (see page 35).
Drive the rudder to each stop in each direction, and then perform any additional bleeding that may be necessary.
Notice
Check for leaks at every hydraulic tting, both after the bleeding process is complete and after the sea trial is complete.
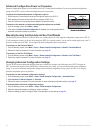
Bleeding the Hydraulic System Through the Compact 2.1 L Pump
The compact 2.1 L pump has a bypass valve to aid in the hydraulic-system bleeding process. In addition to the general instructions in
the following section, follow the standard bleeding recommendations provided by the manufacturer of your helm.
NOTE:
Neither the 1.2/2.0 L pump nor the legacy 2.1 L pump has this bypass valve. These steps only apply to the compact 2.1 L
pump.
General hydraulic bleeding procedures:
1. Ensure the helm reservoir is full of hydraulic uid. Add uid if necessary.
2. Manually steer the helm to both cylinder stops.
3. Manually steer the helm fully to port to the stop.
4. Open a bypass valve at the cylinder ports.
5. Turn the helm slowly to port for 3 minutes.
6. Close the cylinder bypass valve.
7. Check the helm reservoir level, and add uid if necessary. Continue to perform steps 2 through 7 until the helm reservoir level
remains full.
8. Open the bypass valve on the manifold of the compact 2.1 L pump.
9. Push and hold the soft key on the GHC 10 for 10 seconds, and watch for steering movement. If there is no movement,
push the soft key.
10. Continue to hold the soft key that produces steering movement and steer fully to the stop.
11. Steer the helm to both cylinder stops using the GHC 10.
12. Close the bypass valve on the manifold of the compact 2.1 L pump.
Notice
Ensure that the built-in bypass valve on the pump manifold is fully closed during normal operation to avoid possible autopilot
performance degradation.
13. Check the helm reservoir level, and add uid if necessary. Perform steps 2 through 7 until the helm reservoir level remains full.
•
•
•