


NOTE: In order to minimize the potential for interference with other marine
electronics, a separate power source (such as a second battery) may be
necessary.
You are now ready to install the transducer. Find the section that refers to
your specific transducer installation method.
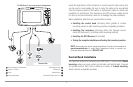
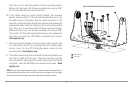
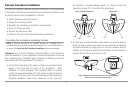
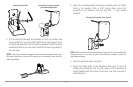
Transducer Installation
There are three different installation methods for your transducer:
• Transom Transducer
• Inside the Hull Transducer
• Trolling Motor Transducer.
Your 900 Series™ uses a Two Piece Kick-up transducer mounting bracket.
Find the section that describes the method of installation you will be using.
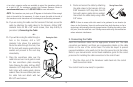
NOTE: If the included transducer will not work for your application, you may
exchange it, NEW and UNASSEMBLED, with mounting hardware included, for a
transducer appropriate for your application - often at very little or no charge
depending on the transducer. Call the Humminbird® Customer Resource Center
at 1-800-633-1468 for details and pricing, or visit www.humminbird.com.
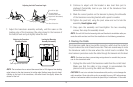
NOTE: Due to the wide variety of hulls, only general instructions are presented
in this installation guide. Each boat hull represents a unique set of requirements
that should be evaluated prior to installation. In addition to the hardware
supplied with your transducer, you will need a powered hand drill and various
drill bits, various hand tools, including a ruler or straightedge, a level, a 12" plumb
line (weighted string or monofilament line), marker or pencil, safety glasses and
dust mask, and marine-grade silicone sealant.
NOTE: Please read all instructions carefully and completely before beginning the
installation process.
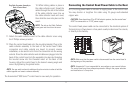
NOTE: When drilling holes in fiberglass hulls, it is best to start with a smaller bit
and use progressively larger drill bits to reduce the chance of chipping or flaking
the outer coating.
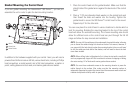
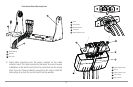
NOTE: Your transducer may not look exactly like the transducer shown in the
illustrations, but it will mount in exactly the same way.
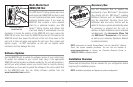
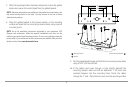
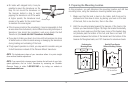
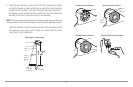
1a. If a fuse terminal is available, use crimp-on type electrical
connectors (not included) that match the terminal on the fuse
panel. Attach the black wire to ground (-), and the red wire to
positive (+) 12 VDC power. Install a 3 amp fuse (not included) for
protection of the unit. Humminbird® is not responsible for over-
voltage of over-current failures.
or...
1b. If you need to wire the control head directly to a battery, obtain
and install an inline fuse holder and a 3 amp fuse (not included)
for the protection of the unit. Humminbird® is not responsible for
overvoltage or over-current failures.
12