


6-3
A3280 Rev 1.2
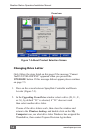
Weather Station Operation/Installation Manual
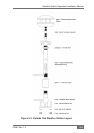
Screw the 3/4” (19mm) Threaded Socket (2302030) (Figure 5-3
on page 5-3) tightly to the Marine Mount
Screw the 4. Mounting Pole (M247) (Figure 5-3 on page 5-3)
(with the outlet for the harness towards the Marine mount), to
the Threaded Socket (Figure 5-3 on page 5-3)
Route the Weather Station 5. Power/Data Harness 26 ft
(8 metres) (A3372) (Figure 5-2 on page 5-2), through the outlet
on the pole (Figure 5-3 on page 5-3)
The6. In Line Terminator (Y943) is already connected to the
A3372 harness (Figure 5-3 on page 5-3)
Screw the 7. 3/4” (19mm) Back nut (2052030) onto the pole (Figure
5-3 on page 5-3), screw the nut to the bottom of the pole thread
Screw the Weather Station 8. Pole Mount Base onto the pole
(Figure 5-3 on page 5-3)
The Pole Mount Base has three small holes for mounting
screws and one larger hole for the humidity sensor.
Screw the 9. In Line Terminator (Y943) to the connector at base of
the Weather Station (Figure 5-3 on page 5-3)
Place the Weather Station down on the 10. Pole Mount Base and
attach the Weather Station to the Pole Mount using the
included brass mounting screws and lock washers (Figure 5-3
on page 5-3)
Do not screw the Weather Station Pole Mount base
all the way down (leave a few threads), to allow the
Weather Station to be fitted in the right direction.
TIP