


Calibrate, measure, run, and saved results
Overview of running a session
Sound Examiner SE-400 Series
16
Calibrate, measure, run, and saved results
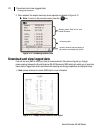
This chapter provides you with the tools used to perform a field test and review the data results. It also details
how to work with the SoundPatrol feature and a brief overview of DMS setup, downloading, and viewing data
in charts and graphs.
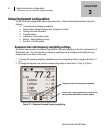
Overview of running a session
The list below is a brief overview of the steps for running a sound level session.
Calibrate
It is recommended to calibrate your Sound Examiner SE-400 Series before and after a run to ensure highly
accurate measurement results. The SE-400 microphone is sensitive to humidity and pressure changes.
Calibrating the instrument prior to taking measurements assures the instrument is accurate for the current
environment. Performing a calibration after a log session (post-cal) verifies that environmental conditions
have not significantly changed during the log session.
Note: Performing calibrations also ensures the microphone is operating correctly and not damaged (i.e.,
torn or contaminated diaphragm.
You can calibrate the instrument in the field with reference to the output of a calibrated sound source. 3M
offers a line of acoustic calibrators that are available for performing calibration of the Sound Examiner such as
the 3M
TM
AcousticCal AC-300 Calibrator and the QC10/20 calibrator.
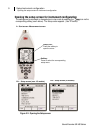
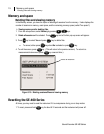
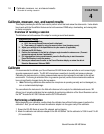
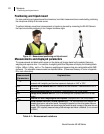
Performing a Calibration
Before beginning your calibration, confirm/check the calibrator has sufficient battery power to perform the
calibration. Also, you will want to insert the calibrator adapter into the upper cavity of the calibrator.
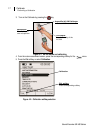
1. Ensure the SE-400 Series is turned On, stopped, and not logging.
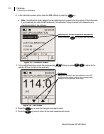
2. Attach the calibrator and calibrator adapter to the SE-400 Series. Set the calibrator to 1000 Hz and 114 dB
(if it is selectable).
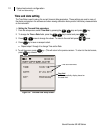
CHAPTER
4
Operation/Field Testing
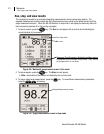
1. Turn on the Sound Examiner.
a. LAS: the current Sound Pressure Level is displayed.
b. Clear memory (if needed by using the memory menu from the setup screen).
2. Adjust your settings to fit the specifications for your session (if applicable).
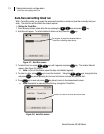
3. Calibrate the SE-400 Series.
4. Position the instrument in the field at a 0 degree angle towards the noise source. (Connect
appropriate external devices if applicable.)
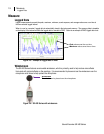
5. For integrated/time history measurements, press the Run/Stop key to start the session.
Press Run/Stop key to stop the session.
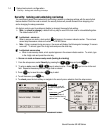
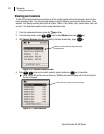
6. Review your measurement results on the Sound Examiner display or review the data in
Detection Management Software (DMS).