


32
33
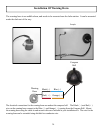
11. Restart the autopilot by pressing and releasing the Deckmount On/Off switch.
12. Autotune. The autopilot’s autotune function can really simplify the problem of adjusting the feedback gains. The autotuner
will adjust the gains well enough that you may not need to do any additional adjustments at all. You can adjust the autotune results after
autotuning if needed.
In order to use the autotuner (or to tune the autopilot yourself), you must be in calm water with very little wind. You will let the autotuner
drive your boat for several minutes, so you need to have as much as one half to 1 full mile of clear water in front of you when you start
autotune. The autotuner will drive in a zigzag pattern and may not maintain the course you initially started on. You can abort autotuning
at any time by pressing any button on the remote or by pressing the deckmount switch, or by steering from the helm.
You will do autotuning at a xed RPM, don’t change throttle settings once the autotuner has been started. (If autotune fails try it
again at a slower speed). Make sure the engine is trimmed all the way down and trim planes are fully retracted, and make sure the boat
isn’t listing. Don’t move around in the boat while autotune is underway. If your boat has a vee bottom and tends to roll a lot when the
rudder moves, you will get better autotuning results by doing autotune at lower RPMs than indicated above.
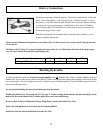
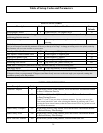
Step G. The Autotuner will zigzag the boat for 15 cycles. If you run out of room, abort the tuner and try it again in a spot where you
have more room to maneuver. You would like to see the time for one complete zigzag cycle to be between 3 and 6 seconds. Adjust RPM
up to reduce cycle time and adjust the RPM down to increase the cycle time. The zigzagging will stop when the autotuner is done. Be
prepared to regain control of the boat.
• If the tune was good, both the [Up Arrow] LED and the [Down Arrow] LED will turn on solid for 5 seconds
• If boat goes into circles, verify steering direction in step 4, page 28. (hoses could be reversed)
• If the tune failed, both the [Up Arrow] LED and the [Down Arrow] LED will blink for 5 seconds.
• If tuning conditions are real bad, the unit will simply go directly back to standby or shut down with no arrow
LED indications at all.
• If the quality of the tune is suspect, the [Down Arrow] LED (only) will blink for 5 seconds; this may not be a
bad tune - so try it in autopilot mode rst before tuning again.
When autotune is done, check out the steering performance at low and high speeds. If low speed performance isn’t too
good, try autotuning again. If, after several attempts at autotuning, the performance isn’t good you will need to resort to
the ne tuning procedure in step 15.
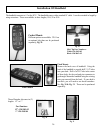
13. If the tune was good or suspect
download to permanent memory the parameters you have adjusted so far
(autotune). With the [Setup] LED lit, press and hold the GPS [Select Load] button-the load LED should illuminate,
press and release the [Deckmount] button, then release the GPS [Select load] button.
Note: Press and release the [Setup] button to exit setup mode.
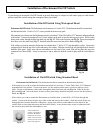
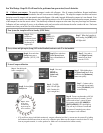
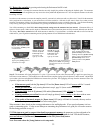
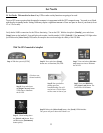
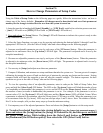
Step A. The autopilot must
be in standby. [STBY] LED
is illuminated.
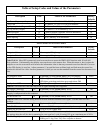
Step E. Bring the engine(s) up to
speed (lower RPM not planing)
and steer the boat on a constant
heading.
Step F. To engage autotune:
Press and HOLD the GPS
[Select Load] button. While
holding down the [Select Load]
button, Press and release the
[Deckmount] button once
quickly. Release the [Select
load] button.
Step B. Press, release, and
light up the [Setup] button
(left) LED will light.
Step C. Press and
release the [Left
Chevron] button
two times, and
light up #5 LED.
Step D. Press and
release the [Right
Chevron] button
two times, and
light up #8 LED.