


11
PART 4
OPERATIONS
This iServer can be used and configured in several ways, depending on user’s
preference and network setup. It can be configured using a Web browser, like Netscape
or Internet Explorer. It can also be configured using NEWPORT’s iCONNECT
Configuration Software.
If DHCP and DNS servers are used, the connection is very simple, no need to find the
right IP address or watch for network conflicts, these are all done for you by your network
DHCP and DNS server. All that is left for you to do, is to enable DHCP on the iServer (see
Section 2.2) and use a straight network cable to connect the iServer to a hub and power
it up.
If DHCP is not the preferred method, you can configure your PC’s network connection with
an IP address of 192.168.1.x that is in the same range as the iServer’s default IP address
(192.168.1.200) and connect to the iServer using a cross-over network cable between your
PC’s network port and the iServer. After you’re done with configuring the iServer, you can
always set your PC back to its original settings.
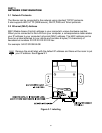
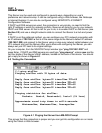
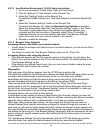
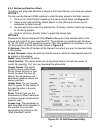
On your computer, from the MS-DOS Prompt window type "ping 192.168.1.200” and
press Enter. If DHCP and DNS servers are used type “ping eisxxxx”, where xxxx are the
last four digits of the iServer’s MAC address, located on the back of the device. You should
get a reply as shown in Figure 4.1.
4.0 Testing the Connection
Figure 4.1 Pinging the iServer from MS-DOS Prompt
This proves that the connection is proper and you can get into configuration or run mode
using the Telnet or Web browser.
C:\>ping eis03ec
Pinging eis03ec with 32 bytes of data:
Reply from eis03ec: bytes=32 time=15ms TTL=60
Reply from eis03ec: bytes=32 time=8ms TTL=60
Reply from eis03ec: bytes=32 time=8ms TTL=60
Reply from eis03ec: bytes=32 time=8ms TTL=60
Pinging statistics for eis03ec:
Packets: Sent=4, Received=4, Lost=0 (0% loss)
Approximate round trip times in milli-seconds:
Minimum=8ms, Maximum=15ms, Average=9ms