


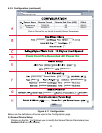
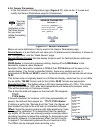
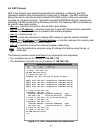

F) Flash Recording
T
itle: Editable field with up to 16 characters long. The given name will display as a title on
the Chart and Read Sensor pages either for the real-time data or the stored data.
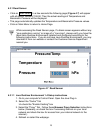
Sensor Unit:
The unit of temperature either in degree Fahrenheit F or degree Celcius C for
each type of barometric pressure unit hPa, inHg or mmHg..
LCD/PWR
: The selections are “ON ”, “OFF ”, and “UPS”. Selecting “OFF” will cause the
LCD to turn off during a power outage, provided the battery is connected. The current
consumption is about 1.5mA or 3mA depending on “OFF ” or “ON ” selection respectively.
If recording is “ON “, depending on the recording interval, the LCD will be updated every
10 seconds or 1 minute. Therefore, when the LCD is set to “ON ”, it could take some time
before the LCD is turned on. If recording is not “ON “, the LCD will be updated every 10
seconds.
Selecting “UPS” puts the iServer into full operational mode when it’s running on the battery
(S5 jumper needs to be installed, see Section 2.4 and 2.7). This means that in case of
power outage, sensing, recording, LCD display, and network communication capabilities of
the iServer will all operate on the battery. Due to heavy power consumption the battery will not
last more than an hour.
T
ype
: The selections are: “Limited”, “Wrap”, or “Nonwrap”.
Limited: You must define the Start Date and Time, and End Date and Time in which
you need the recording to be done.
Wrap: You only need to define the Start Date and Time. The iServer will record data
until the Flash is full, then the iServer will continue to record and overwrite the existing
data.
Nonwrap: You only need to define the Start Date and Time. The iServer will record
data until the Flash is full, then the iServer will stop recording.
Interval
: The recording interval at which the temperature or barometric pressure is being
stored into the Flash Card. The selections are “10 seconds“ and “1 minute“.
Activation:
The selections are “Status/RTC/Alarm”, “StartRecord ”, “Configuration”, and
“StopRecord ”. Refer to previous scenarios #1 and #2 at the beginning of this Section
4.3.5 for more details.
Status/RTC/Alarm: Select “Configuration” and “Status/RTC/Alarm”, each followed by
clicking the Update button to retrieve the latest recording settings. By selecting
“Status/RTC/Alarm” only, followed by clicking the “Update” button the iServer will report
back all the settings, but the “Recording” settings.
StartRecord: Select to initiate a recording.
Configuration: Select to retrieve the latest recording settings, followed by
“Status/RTC/Alarm” option.
StopRecord: Select to stop an ongoing recording.
Reset: Selecting this option will reset the flash memory, LCD, recording sections, and
the Ethernet connection to a fresh start. It is suggested to select “Reset ” followed by
clicking the “Update” button if you experience recording problems.
Start Date, T
ime: Starting date and time for recording. The format is mm/dd/yyyy and
hh:mm:ss, it must be followed exactly. Entry is required for all Types of Flash Recording.
End Date, Time: Ending date and time for recording. The format is mm/dd/yyyy and
hh:mm:ss, it must be followed exactly. Entry is required for Limited Type of Flash
Recording only.
NOTE 1: While the recording is in progress, the first letter of the measurement unit (“h”P, “i”Hg or
“m”Hg), located on the LCD screen blinks continuously.
23