


11
Please Do Not Return This Product To The Store. Contact your local Wayne-Dalton dealer. To find your local Wayne-Dalton dealer, refer to your local
yellow pages business listings or go to the Find a Dealer section online at www.Wayne-Dalton.com
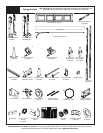
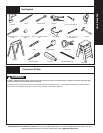
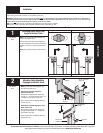
Tools Needed:
INSTALLATION
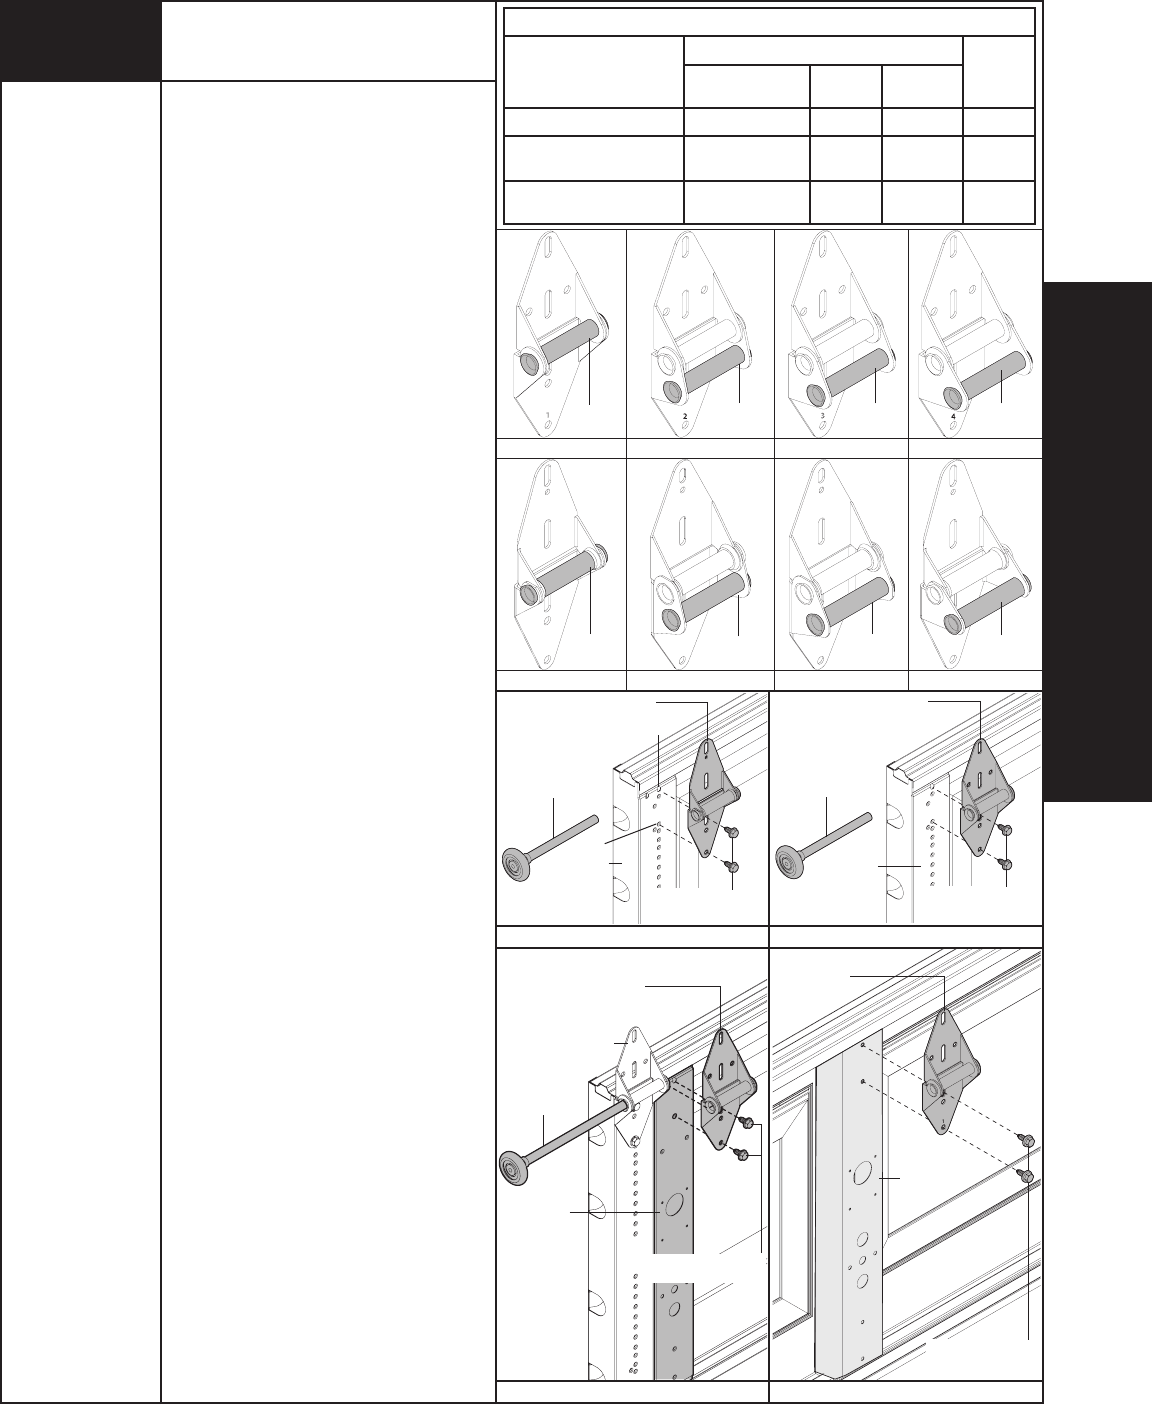
1
2
3
4
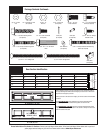
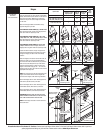
#1 Wide hinge
#2 Wide hinge
Roller
placement
1
2
3
4
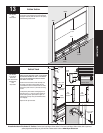
Hinges
Power Drill
7/16” Socket Driver
#3 Wide hinge
#4 Wide hinge
Roller
placement
Roller
placement
#1 Narrow hinge
#2 Narrow hinge
#4 Narrow hinge
#3 Narrow hinge
Roller
placement
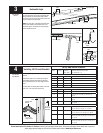
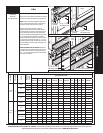
Hinge Schedule
Option codes
End hinges
Wide
center
hinges
Quantity # of end
hinges per side
Wide end
hinges
Narrow end
hinges
1100, 1120 1 None Yes None
1101, 1102,1103, 1104, 1121,
1122, 1123, 1140, 1141, 1143
1 Yes None None
1124, 1125, 1142, 1144 2 Yes None
As
required
Roller
placement
Roller
placement
Roller
placement
Roller
placement
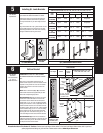
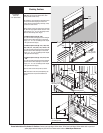
NOTE: Refer to the door section identification on
page 4 to determine your lock (second), intermediate
(third), intermediate II (fourth section on a five section
door), and top sections. Measure your sections to
make sure they are the correct height as indicated
on the chart.
Refer to the hinge schedule to determine the ap-
propriate hinges for your door.
FOR WINDLOAD OPTION CODES (A): 1100 OR 1120:
One narrow end hinge, narrow center hinge(s) and a
short stem roller are required, per side.
FOR WINDLOAD OPTION CODES (B): 1101, 1102,
1103, 1104, 1121, 1122, 1123, 1140, 1141, or 1143:
One wide end hinge, narrow center hinge(s) and a
short stem roller are required, per side.
FOR WINDLOAD OPTION CODES (C): 1124, 1125,
1142, or 1144: Two wide end hinges, wide center
hinge(s) and a long stem roller are required, per side.
Locate the bottom section, using #1 hinges for the
end stiles and depending on the width of your door,
enough #1 hinge(s) for each of the center stile(s)
location.
Place the hinges on the section so that the lower (#)
leaf of the hinge is over the pre-punched holes in
the #1 and #4 of the end stiles and the pre-punched
holes of the center stile(s) at the top of the section.
(See end stile hole pattern on page 9.) Secure the
hinges to the section using (2) 1/4” - 14 x 7/8” self
tapping screws for each, then insert the roller into the
appropriate end hinge tube.
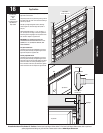
NOTE: The #1 hinges serve as end hinges and center
hinges on the bottom section. The #1 hinges also
serve as center hinges at all center hinge locations.
Use #2 end hinges and #1 center stile hinges for the
lock section (second section) of the door.
Use #3 end hinges and #1 center stile hinges for the
intermediate section (third section) of the door.
Use #4 end hinges and #1 center stile hinges for the
intermediate section II (fourth section) of the door.
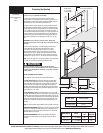
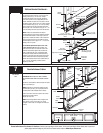
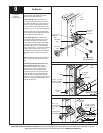
IMPORTANT: WHEN PLACING ROLLERS INTO END
HINGES NUMBER 2 AND HIGHER, THE ROLLER GOES
INTO TUBE FURTHEST AWAY FROM SECTION.
NOTE: #4 End hinges are used on fourth section of a
five section door.
1
1
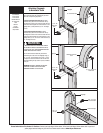
Previously installed
Wide end hinge
Long stem
roller
Wide end
hinge
(2) 1/4”- 14 X 7/8”
Self drilling screws
Stile
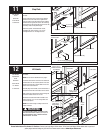
TYPICAL CENTER HINGE INSTALLATION
Typical
center hinge
Center
stile
(2) 1/4”- 14 x 7/8”
Self drilling screws
(C)
1
(B OR C) WIDE END HINGE INSTALLATION
(2) 1/4”- 14 x 7/8”
Self drilling screws
Wide end hinge
Short stem
roller
End stile
1
(A) NARROW END HINGE INSTALLATION
(2) 1/4”- 14 x 7/8”
Self drilling screws
Narrow end hinge
Short stem
roller
End stile
#1
#4