


D9112 Operation & Installation Manual
Page 1674-06144-000-C 2/96
© 1993-1996 Radionics
Finishing the Installation
Earth ground and reset pin first: Make the earth ground connection to terminal 10 and
lock the reset pin in the closed position if you haven’t already done so.
Charge the Battery as You Finish
Connect the battery and then the transformer so that the panel can charge the battery as
you finish the installation. See the Power Supply section for instructions.
On-board Buzzer Sounds at Power Up and Reset: The D9112 performs a series of
self diagnostic tests of its hardware, software, and program at power up and at reset. The
buzzer on the D9112 sounds during the tests. They take about 10 seconds to complete.
If the panel fails any of the tests, the buzzer continues sounding and a system trouble
message appears at the command centers. See Self Diagnostics in the Trouble Shooting
section for a description of each system trouble message.
Touch Terminal 10 first: If the on-board buzzer sounds briefly when you touch the
panel, you're discharging any static charge you may be carrying to the panel. The panel
may generate WATCHDOG RESET and/or PARAM FAIL events. See the Trouble
Shooting section for a description of these events. Always touch terminal 10, the panel's
earth ground connection, before beginning work on the panel.
Install and Wire Detection Devices
Install and wire detection devices and command centers at their locations throughout the
premises. DO NOT make the connections at the panel end of the wiring yet.
The On-Board Points section of this manual contains instructions for wiring the on-board
points to detection devices. The Arming Devices section contains instructions for wiring
the command centers.
Instructions for wiring the off-board point POPIT sensor loops are found in the
instructions packaged with the POPIT modules.
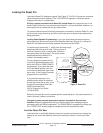
Install Modules and Relays
1. Power Down First: Power down the D9112 by unplugging the transformer and
disconnecting the battery. Radionics recommends that you power down the D9112
when installing modules or relays, or when making wiring connections to the panel.
2. Install and wire any modules required for your installation as described in the
module’s installation instructions.
Instructions for the D8125 POPEX Module, the D8128A OctoPOPIT Module, the
D8129 OctoRelay Module, the D811 Arm Status Relay Module, and the D128 Dual
Phone Line Switcher appear in this manual.
See Off-board Points for D8125 and D8128A instructions. See Relays for D8129 and
D811 instructions. See Dual Line Transmitting in the Telephone Connections section
for instructions for the D128.
3. If you are using the power outputs at terminals 7 or 8, install a D136 relay in the
appropriate sockets. See Programmable Power Outputs in the Power Outputs
section for instructions.
4. If you are using a ground start phone system, insert a D136 relay in socket K6/J5 and
set the ground start pin in the ground start position. See Ground Start in the
Telephone Connections section.