


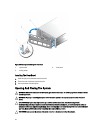
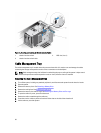
Chassis Intrusion Switch
CAUTION: Many repairs may only be done by a certified service technician. You should only perform
troubleshooting and simple repairs as authorized in your product documentation, or as directed by the online or
telephone service and support team. Damage due to servicing that is not authorized by Dell is not covered by your
warranty. Read and follow the safety instructions that came with the product.
The chassis intrusion switch is located on the Network Daughter Card riser (riser 1), connected to the IO riser card. It is
used to detect unauthorized access to the inside of the system. The intrusion is indicated on the Embedded Server
Management (ESM) when the chassis cover is open.
NOTE: If the intrusion cable is missing or not plugged-in, a notification is received in the ESM and intrusion status
is not logged in the system event log.
Removing And Installing The Chassis Intrusion Switch Cable
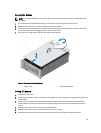
1. Turn off the system, including any attached peripherals, and disconnect the system from the electrical outlet.
2. Open the system.
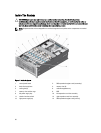
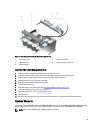
3. Locate the intrusion switch on the Network Daughter Card (NDC) riser or riser 1.
NOTE: The chassis intrusion switch is detachable from the NDC riser. Ensure that it is not removed, so that
the chassis intrusions are detected.
4. Remove the NDC riser. See Removing the NDC Riser (Riser 1).
The intrusion switch cable is on the I/O riser card.
5. Press and remove the intrusion switch cable connected to the intrusion switch.
The intrusion switch cable is unplugged. It is indicated in the ESM when the system is powered on.
6. Reconnect the intrusion switch cable to the IO riser card.
The intrusion switch cable is connected and the chassis intrusion status is indicated on the ESM when the system
is powered on.
7. Install the NDC riser. See Installing the NDC Riser (Riser 1).
8. Close the system.
9. Reconnect your system and peripherals to their electrical outlets, and turn on the system.
37