4 – Recording
Dividing files and creating new files
while recording
Creating new files manually while recording
(track incrementing)
You can manually split a recording by creating a new le.
Press the / button while recording.
NOTE
When new files are created, incremental numbers are
•
added to the end of each file name.
A new file cannot be created if the total number of files
•
and folders would exceed 999.
Files shorter than two seconds cannot be created.
•
If the name of a newly created file would be the same as
•
that of an existing file, the number will be incremented
until the new file has a unique name.
Track increment is not possible in OVERDUB mode.
•
Creating new files automatically while
recording (automatic track incrementing)
Without pausing recording, a new le can be created
automatically during recording when a le size or analog
input level set in advance is exceeded. (See “Selecting le
format, sampling frequency, and maximum le size” on
page 27 and “Start new les automatically during recording
(TRK INC)” on page 36.)
Automatically cutting silences during
recording
The unit can be set to automatically pause recording when
it detects silence, and then restart recording when the
signal is input again. (See “Enabling automatic recording”
on page 35 and “Automatically pausing recording (PAUSE)”
on page 36.)
This does not create new les, but cuts unnecessary
silences, reducing the amount of card space used.
Moreover, a mark is automatically added at the time when
the unit pauses, making division after recording easy. (See
“Moving to a mark position” on page 37.)
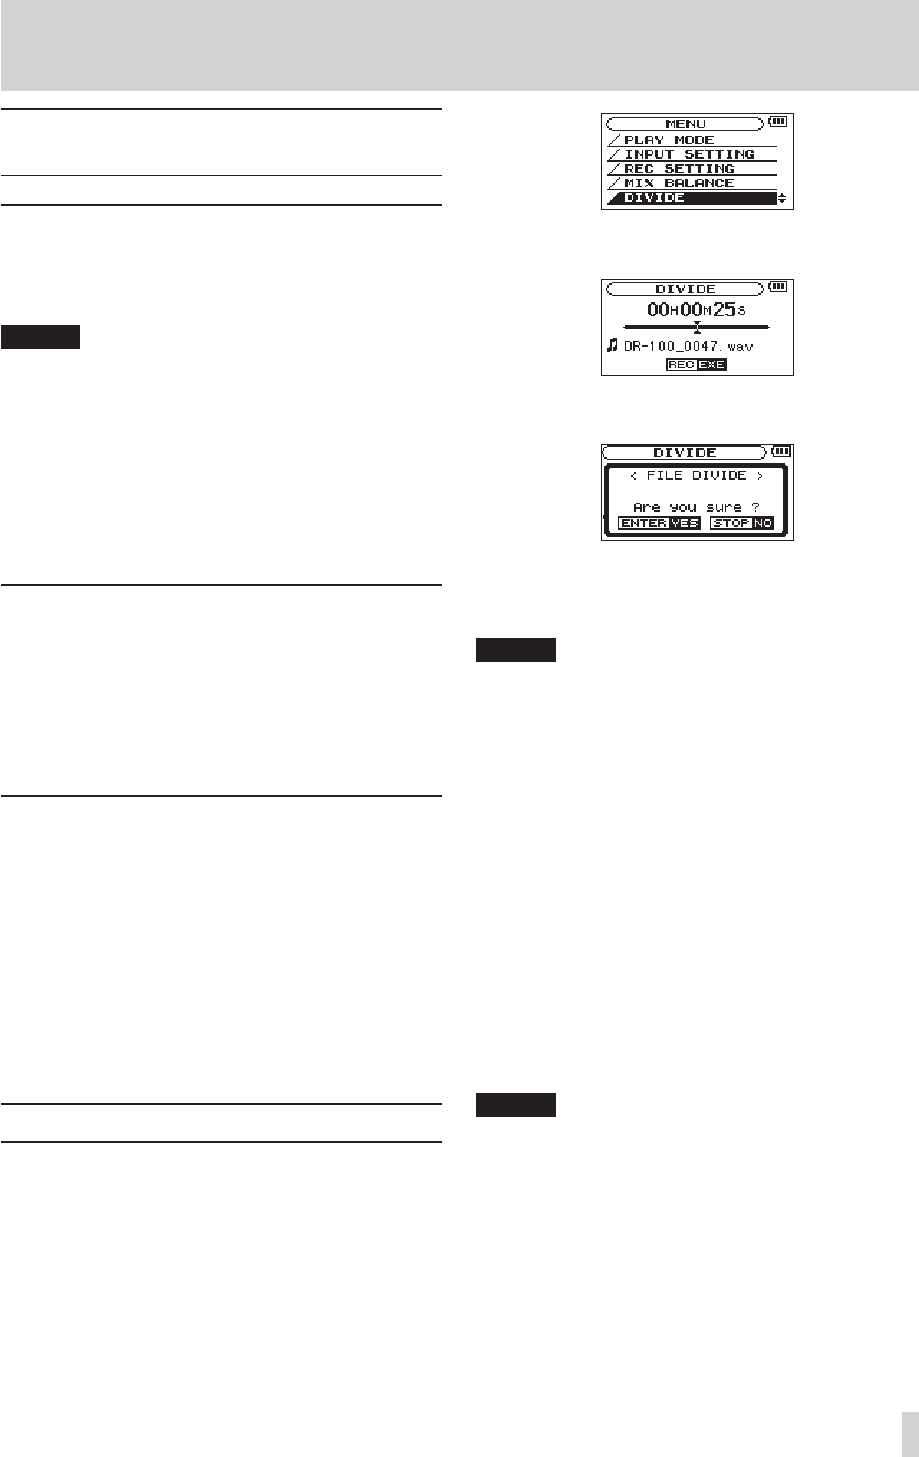
Dividing a file manually (DIVIDE)
You can split a recorded le into two les at any position
you like. This is convenient for splitting a continuous
recording into multiple les.
1 Select a file to be divided using the . or /
button or the
BROWSE
screen.
2 Press the MENU button to open the
MENU
screen.
3 Use the wheel to select
DIVIDE
menu item.
4 Press the ENTER/MARK button to open the
DIVIDE
screen.
5 Use the wheel to determine where the file will be
divided, and press the RECORD [0] button.
6 Press the ENTER/MARK button to divide the file, or
press the STOP [0] button to cancel the operation
and return to the
DIVIDE
screen.
NOTE
When the
•
DIVIDE
screen is open, you can press the
PLAY/PAUSE (y/9) button and to set the divide
position while playing the track.
After dividing a file, two new files with ”_a” and ”_b”
•
added to the end of the original file name are created.
For example if the original filename is “DR-100_0000.
wav” then the new files will be named “DR-100_0000_
a.wav” (the recording before the division point) and
“DR-100_0000_b.wav” (the recording after the division
point).
MP3 files cannot be divided.
•
If the SD card has insufficient open space, division might
•
not be possible.
Division is not possible if the file name would become
•
more than 200 characters long.
Division is not possible if a file that already exists has the
•
same name as the name that would be given to a new
file created by division.
TIP
Add marks during recording at positions where you
•
want to divide a file.
Marks can be added manually (s
•
ee “Adding marks
manually during recording and playback” on page 36)
or automatically when the unit detects silence (see
“Automatically adding marks when recording (MARK)”
on page 35). These marks can be easily located after
recording (see “Moving to a mark position” on page 37).


