


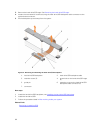
Steps
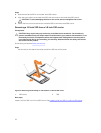
1. If installed, remove the PERC H730P slim card blank.
2. Press the release latch on the side of the chassis to the unlock position.
NOTE: Ensure that all the memory-module ejectors are in the closed position.
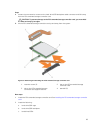
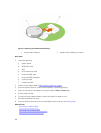
3. Align the slots on the PERC H730P slim card with the standoffs on the side of the chassis.
4. Lower the PERC H730P slim card into the chassis until the slots on the card engage with the
standoffs on the side of the chassis.
5. Press the release latch to the lock position to secure the card firmly on the chassis.
The PERC H730P slim card connects to the backplane connector.
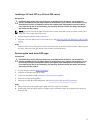
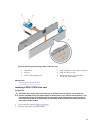
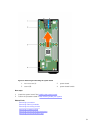
6. Hold the pull tag on the PERC H730 slim-card cable connector and route the cable between the
memory-module ejectors.
7. Align the retention screws on the PERC H730P slim-card cable connector with the screw holes on
the system board connector.
8. Tighten the two retention screws to secure the PERC H730P slim-card cable connector on the
system board.
Next steps
Follow the procedure listed in After working inside your system.
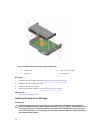
Storage controller card
Your system includes a dedicated expansion-card slot on the system board for a storage controller card
that provides the integrated storage subsystem for your system’s hard drives. The storage controller card
supports SSD/SAS/SATA hard drives.
NOTE: The storage controller card is located underneath the hard-drive/SSD cage.
Removing the PCIe extender/storage controller card
Prerequisites
CAUTION: Many repairs may only be done by a certified service technician. You should only
perform troubleshooting and simple repairs as authorized in your product documentation, or as
directed by the online or telephone service and support team. Damage due to servicing that is
not authorized by Dell is not covered by your warranty. Read and follow the safety instructions
that came with the product.
NOTE: PCIe extender/storage controller card is supported on systems with the SAS backplanes.
1. Ensure that you read the Safety instructions.
2. Keep the #2 Phillips screwdriver ready.
3. Follow the procedure listed in Before working inside your system.
4. Remove the following:
a. hard drives/SSDs
b. hard-drive/SSD backplane
c. hard-drive/SSD cage
84