


21
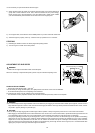
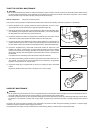
1) Position the earth auger on a suitable work bench with the operator handle level with the
ground. As an alternative, the transmission drive shaft can be securely mounted in a suit-
able bench vice. Wipe any dust or dirt from the area where the transmission separates.
2) Loosen and remove the six capscrews that fasten the transmission together. Using the
rubber hammer, split and separate the transmission cover and case.
Exercise caution not to damage the dowel pins located on opposite end of the transmis-
sion.
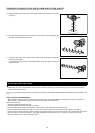
3) If the bearing journals of the secondary gear are difficult to remove from the ball bearings,
it may be much difficult to separate the transmission cover and case. It may be necessary
to provide a supplemental force to the pinion journals to assist the removal process.
4) Remove the gasket.
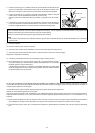
5) Remove the primary gear and pinion assembly.
6) Clean the interior surfaces of the transmission cover and case with an approved safety solvent.
7) Clean each gear with an approved safety solvent. Inspect the teeth for excess wear, cracks or fatigue.
Replace each component as necessary.
8) If necessary, reinstall panhead screw into the bearing housings. Properly secure it.
9) Fill the transmission cover and case with 8 ounces (224 g) of high temperature transmis-
sion grease containing an extreme pressure additive. Fisk Brothers GR-132 or equivalent
lubrication grease is an approved lubricant.
If the Fisk Brothers lubricant is not available, an acceptable alternative is a marine-grade
wheel bearing grease that contains an EP (denoting extreme pressure) additive. Distribute
the grease equally around all gear teeth.
DO NOT USE STANDARD LITHIUM BASED GREASES INTENDED FOR COMMON LUBRICATION PURPOSES. These types of grease are
not formulated to operate at the higher operating temperatures encountered during the hole digging process. Such greases also do not contain an
extreme pressure additive for use with gears.
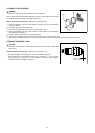
10) Reinstall the primary gear and pinion assembly. Distribute the grease equally around all gear teeth.
Replace the old transmission gasket with a new gasket.
Align the transmission dowel pins when reinstalling the cover. Reinstall the fasteners with the hexagon nuts on the cover side of the transmission.
Torque all fasteners to 96 in lbs (12 N.m.) The second fastener should be diagonally opposite from the first fastener, i.e. torque fasteners in an “X”
sequence.
11) Rotate the final driveshaft and check for excessive noise or binding. If excessive noise or binding is evident, disassemble the transmission
and investigate for probable causes. Reassemble and retorque to the specified amount. Recheck for excessive noise or binding.
12) Inspect the earth auger for loose, worn or damaged parts. Replace any questionable part or assembly with a genuine, approved replacement
part.
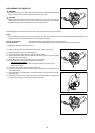
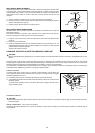
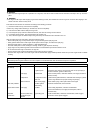
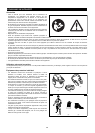
Remove the panhead screw from both bearing housings.
Insert a 1/4-20 UNC capscrew of one inch minimum length into the housing. Turn the capscrew in a clockwise direction. This provides thrust
against the pinion bearing journal until it clears the pinion gear support bearing.
Repeat the process with the remaining pinion gear bearing journal if necessary.
NOTE:
• This process is only necessary if the fit between the pinion gear journals and the ball bearings do not allow disassembly of the transmission
cover and case.
Drive shaft
Panhead screw
Capscrew
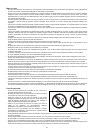
Secondary gear
Primary gear
Drive shaft