


22 Intel Astor II Server Chassis Subassembly Product Guide
I/O Shield
✏
NOTE
An ATX 2.01-compliant I/O shield should be provided with your server
board. The shield is required by Electromagnetic Interference (EMI)
regulations. It minimizes EMI and ensures proper cooling of the server. If
the shield does not fit the chassis, obtain a properly sized shield from the
chassis supplier.
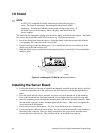
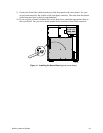
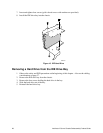
The shield fits the rectangular opening near the power supply in the back of the chassis. The shield
has cutouts that match the external I/O connectors (e.g., keyboard and mouse).
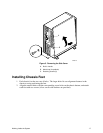
1. Install the shield from inside the chassis. Orient the shield so that the cutouts align with the
corresponding I/O connectors on the server board.
2. Position one edge so that the dotted groove (A) is outside the chassis wall, and the lip of the
shield rests on the inner chassis wall.
3. Hold the shield in place, and push it into the opening until it is seated (B). Pressure holds the
shield in place.
OM06332a
A
B
Figure 10. Installing the I/O Shield
(typical shield shown)
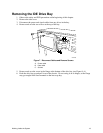
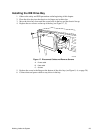
Installing the Server Board
4. Position the board over the snap in standoff and threaded standoffs inside the chassis, and slide
it carefully toward the rear of the system until the I/O connectors protrude through the back
panel.
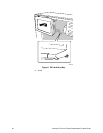
5. Press the board onto the snap in standoff, and insert one screw through one of the mounting
holes of the board and into a threaded standoff. Do not tighten the screw until the next step.
6. Insert the remaining screws through the mounting holes and into the threaded standoffs. Make
sure the board is properly seated, and then tighten all the screws. Take care to not tighten the
screws more the 6 inch-pounds.
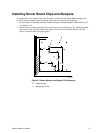
7. Install your processors and memory. See your server board manual for instructions.
8. Connect the power cable to the server board. See your server board manual for the location of
the main power connector. Once it is firmly connected to the server board, bend the wires
towards the front of the chassis. This will help when you install the hot-swap bay.