


24 Intel Astor II Server Chassis Subassembly Product Guide
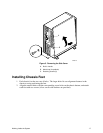
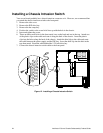
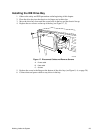
Installing a Chassis Intrusion Switch
Your server board probably has a chassis intrusion connector on it. However, we recommend that
you attach the chassis intrusion switch to the front panel.
1. Remove the side cover.
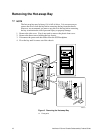
2. Remove the IDE drive bay.
3. Remove the hot-swap bay.
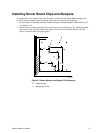
4. Position the switch so the screw hole lines up with the hole in the chassis.
5. Insert and tighten the screw.
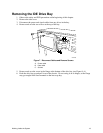
6. There are three small holes in the sheet metal, two on the back and one in the top. Attach two
of the plastic clips to the cable and route it along the back of the chassis. Insert the plastic
clips into the holes along the back of the chassis. Attach the third clip to the cable and route
the cable between the power supply and the IDE bay. Insert the third clip into the hole in the
top sheet metal. Route the cable behind the 5.25-inch drive bay.
7. Connect the chassis intrusion switch cable to the front panel.
OM08475
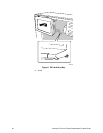
Figure 12. Installing a Chassis Intrusion Switch