Working With Charts And Routes
4-21
6. In the Range field, type the range at which you want WP2 to
remain relative from WP1. For example, if you enter 300
miles, WP2 will always remain at a range of 300 miles from
WP1, no matter where WP1 is repositioned on the chart.
7. In the Bearing field, type the bearing at which you want WP2
to remain relative from WP1. For example, if you enter 90
degrees, WP2 will always remain at a bearing of 90 degrees
from WP1, no matter where WP1 is repositioned on the chart.
8. Click OK to save your changes and close the Waypoint
Properties dialog box.
To temporarily set one waypoint to specific coordinates:
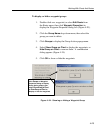
1. Double-click on WP2 to display the Waypoint Properties
dialog box (Figure 4-20).
2. Make sure that the Relative and Pinged boxes are checked.
3. Type the specific coordinates for WP2 into the Latitude
and Longitude fields.
4. Click OK to close and save your settings. WP2 is then
displayed at the new coordinates, while WP remains in its
originally position. The previous relative settings for WP2
are stored by Navigator, so you can return the waypoint to its
relative setting when needed..
To return a waypoint to its relative coordinates:
1. Double-click on WP2 to display the Waypoint Properties
dialog box (Figure 4-20).
2. Click the Pinged box to uncheck it.
3. From the drop-down that appears, select WP1.
4. Click OK close and return WP2 to its relative coordinates.


