


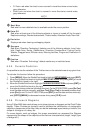


Page 50 GPS Chart Plotters
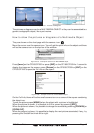
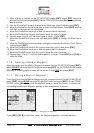
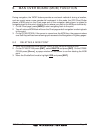
Figure 7.1 - Mark editing
1. After a Mark is created on the CP180/CP180i press [ENT], select EDIT using the
ShuttlePoint knob and press [ENT]. On the CP300/CP300i press [E
DIT] to show the edit
popup window.
2. Use the ShuttlePoint knob to change to the Mark Icon, when finished press [ENT].
3. Move the ShuttlePoint knob to the right to select the Mark Name. Press [ENT] and the
first digit in the name will be highlighted.
4. Move the ShuttlePoint knob up or down to select the first character.
5. Move the ShuttlePoint knob to the right to select the next character.
6. Repeat steps 4 and 5 until the Mark name is shown. Press [ENT].
7. Move the ShuttlePoint knob to the right and press [ENT] to change the Mark Icon’s
Color.
8. Move the ShuttlePoint knob to up/down, left/right to select the Mark Icon’s Color. When
finished press [ENT].
9. Move the ShuttlePoint knob to the right to select the Lat/Lon and press [ENT].
10. Move the ShuttlePoint knob up or down to select the first character.
11. Move the ShuttlePoint knob to the right to select the next character.
12. Repeat steps 10 and 11 until the desired position is shown. Press [ENT] and [CLR] to
store the Mark.
7.1.0 Deleting a Mark or Waypoint
Move the cursor over the Mark or Waypoint to delete. On the CP180/CP180i press [ENT],
select
DELETE using the ShuttlePoint knob and press [ENT]. On the CP300/CP300i, press
[D
ELETE]. A Warning popup window will be shown. Select YES and press [ENT].
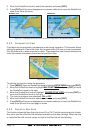
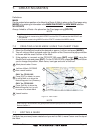
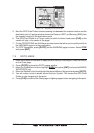
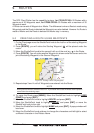
7.1.1 Moving a Mark or Waypoint
Place the cursor over the Mark or Waypoint which you want to move. On the CP180/CP180i
press [ENT], select
MOVE using the ShuttlePoint knob and press [ENT]. On the CP300/
CP300i, press [M
OVE]. Use the ShuttlePoint knob to move the cursor. A dotted line,
connecting the previous Waypoint position to the new position, is shown:
Figure 7.1.1 - Moving Mark or Waypoint (I)
Press [ENT] ([CLR] to abort the move), the Waypoint appears in the new position.