


Page 72 GPS Chart Plotters
Rocks : Sets Off/Icon/Icon+Depth* the displaying of the Rocks. The default setting is Icon.
Obstructions : Sets Off/Icon/Icon+Depth* the displaying of the Obstructions. The default setting is Icon.
Diffusers : Sets Off/Icon/Icon+Depth* the displaying of Diffusers. The default setting is Icon.
Wrecks : Sets Off/Icon/Icon+Depth* the displaying of Wrecks. The default setting is Icon.
NOTE(*)
Choose the options: OFF (the object is not visible independently of the selected “Underwater Object
Depth Value”); ICON (the object icon is visible without tags, in the range selected from “Underwater
Object Depth Value” option); ICON+DEPTH (the object icon and tag is visible, in the range selected
from “Underwater Object Depth Value” option).
12.0.9 Customizing the Data Windows
The data fields contained on the General, 1 Line Small/Large and 2 Line Small data windows
can be changed.
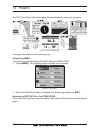
1. To change a data window field, press and hold [MENU] until the field is highlighted.
2. Move the ShuttlePoint knob to the desired data field and press [ENT]. The popup
window will be shown.
3. Move the ShuttlePoint knob up or down to choose the desired setting and press [ENT]
to select and press [CLR] to store and exit the editing mode.
NOTE
Data window field on the NAVIGATION, HIGHWAY, GPS STATUS, and NMEA pages may be
customized in the above manner.
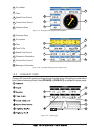
12.1 CUSTOMIZING CHART SETTINGS
1. Press [MENU]. Move the ShuttlePoint knob to highlight SETUP MENU and press [ENT].
2. Move the ShuttlePoint knob to highlight
MAP CONFIGURATIONS and press [ENT] or
move the ShuttlePoint knob to the right.
3. Move the ShuttlePoint knob up or down to select the desired item within the groups
Marine Settings, Depth Settings, Land Settings, Chart Settings or Underwater Settings
and press [ENT]. See the above sections for details on selections.
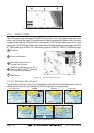
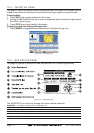
12.2 NAVIGATION PAGE
This page is useful to show information when heading to a destination. The default page is
shown with a Compass Rose, however this can be customized to show a Compass Tape.
1. To change to show the COMPASS TAPE, select the Chart page, press [MENU]. Move
the ShuttlePoint knob to highlight
SETUP MENU and press [ENT].
2. Move the ShuttlePoint knob to highlight
GENERAL SETUP and press [ENT] or move
the ShuttlePoint knob to the right.
3. Move the ShuttlePoint knob to highlight
WINDOW SETUP and press [ENT] and press
[ENT] or move the ShuttlePoint knob to the right.
4. Move the ShuttlePoint knob to highlight
NAVIGATION PAGE and press [ENT] and
press [ENT] or move the ShuttlePoint knob to the right.
5. Move the ShuttlePoint up or down to select
COMPASS TAPE and press [ENT].
6. Press [CLR] or move the ShuttlePoint knob to the right until the Chart page is shown.