


Page 46 CP500
7.3 CREATING/MODIFY A NEW MARK IN THE USER POINTS LIST
NOTE
This function is very useful if you have a list of Marks that you want to enter into the GPS Chart Plotter.
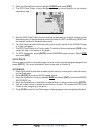
1. Press [MENU]. Move the ShuttlePoint knob to highlight USER POINTS and press [ENT].
2. Move the ShuttlePoint knob to highlight
MARKS/WPTS and press [ENT].
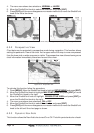
3. The MARKS/WAYPOINTS List page will be shown (see previous Figure).
4. To create a New Mark, move the ShuttlePoint knob to the right to highlight
NEW MARK
and press [ENT].
NOTE
In the User Point List page, you can also modify the Icon, Name, Lat/Lon and Mode to show the Mark
on the Chart page.
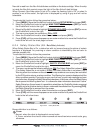
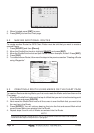
5. Move the ShuttlePoint knob to highlight EDIT and press [ENT] to change the Icon field.
6. Move the ShuttlePoint knob to highlight the desired Icon and press [ENT].
7. Move the ShuttlePoint knob to the right to select the Mark name field. Press [ENT] and
the first digit in the name will be highlighted.
8. Move the ShuttlePoint knob up or down to select the first character.
9. Move the ShuttlePoint knob to the right to select the next character.
10. Repeat steps 8 and 9 until the Mark name is shown. Press [ENT].
11. Move the ShuttlePoint knob to the right to select the Lat/Lon field and press [ENT].
12. Move the ShuttlePoint knob up or down to select the first character.
13. Move the ShuttlePoint knob to the right to select the next character.
14. Repeat steps 12 and 13 until the desired position is shown.
15. Move the ShuttlePoint knob to the right to select the Mode field and press [ENT].
16. Move the ShuttlePoint knob up or down to select the mode to show the Mark. You can
choose among SHOW to show on the chart the name and icon of Mark, ICON to show
on the chart only the icon of Mark or HIDE to hide on the Chart page the created Mark.
Press [ENT].
17. Press [CLR] and a WARNING “Save the new Mark?” popup window will be shown.
Move the ShuttlePoint knob to the right or left to select
YES or NO and press [ENT].
18. Press [CLR] and the new Mark appear on the Chart page.
NOTE
After entering in all the Marks it is a good practice to back up the points to a C-MAP User C-CARD.
Refer to Section 11.
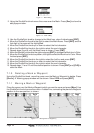
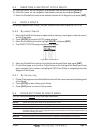
7.4 GOTO CURSOR
The GPS Chart Plotter allows you to quickly start navigating to the Cursor, Route or Mark.
GOTO CURSOR
1. Move the ShuttlePoint knob to the exact position you want to navigate to.
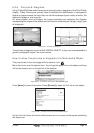
2. Press [GOTO] and a GOTO popup window will be shown
Figure 7.4 - GO TO menu