


Page 52 CP500
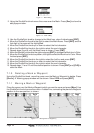
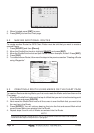
Figure 9.1 - Route Report
4. When finished press [ENT] to save.
5. Press [CLR] to show the Chart page.
9.2 MAKING ADDITIONAL ROUTES
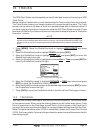
To create another Route the GPS Chart Plotter must be told that you want to create a
second Route.
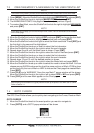
1. Press [ROUTE] and then [R
EPORT].
2. Move the ShuttlePoint knob to highlight
SELECT and press [ENT].
3. Move the ShuttlePoint knob to an open Route number: example, Route 2. Press [ENT].
4. Press [CLR].
5. To create the new Route, follow now the steps in the previous section “Creating a Route
using Waypoints”.
WAAS 3D
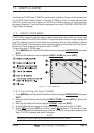
Figure 9.2 - Create additional Route
9.3 CREATING A ROUTE USING MARKS ON THE CHART PAGE
To create a Route containing Marks you first must create the Marks and show them on the
Chart page.
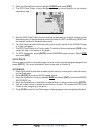
1. Move the ShuttlePoint knob over the top of a Mark that you wish to be the starting point
in the Route and press [ROUTE].
2. Next move the ShuttlePoint knob until the cursor is over the Mark that you want to be
the next leg in the Route.
3. Press [ROUTE]. You will notice a bearing line joins the first and second Mark which
means these Marks are selected into the Route.
4. Repeat steps 3 and 4 until all Marks are entered into the Route.
NOTE
At this point the Route is saved as ROUTE01. If you would like to save the Route under a specific
name follow the steps on the previous 9.1 paragraph.