


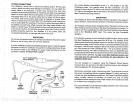
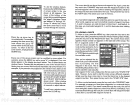

TRANSDUCER
CONNECTIONS
See the
transducer
owner's manual
included with the
unit for
complete
transducer
installation
instructions.
SIDE
SCAN
The UltraNav
II has
optional side-scan
capability.
To use
this
feature, you
must
purchase
theScanpacaccessory.
To install
it,followtheinstructions
enclosed
with the
ScanPac.
See the
"Side Scan
Operation"
section
in this
manual for information
on
using
the side-scan
feature.
SPEED/TEMPERATURE/DISTANCE LOG
To use the
speed,
temperature,
and
distance
log
features,
you
must install
an
optional
spOed/temperature
sensor.
Eagle
manufactures a
thru-hull
sensor/transducer
combination unit
and a transom mount
speed/temp
only
sensor that can be
used with
the UltraNav II.
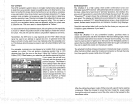
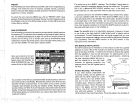
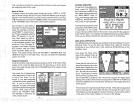
KEYBOARD
The
keyboard
has
keys arranged
in two vertical
columns
plus
a
horizontal
row at the
bottom. The
keys
in the left column
are used to enter
numbers
and menu
selections. The
keys
in the
right
column activate the
windows
feature and
the basic
sonar functions. The
menu
key
in the bottom
right
corner of the
keyboard
activates the
first menu
page.
The
keys along
the
bottom of the screen are
used to
activate the alarm
menu, stop
the
chart,
and make menu
selections with the
arrow
keys.
WINDOWS
-
This
key gives
you
access to the windows
mode,
whichlets
you
customize
displays.
SENS
-
Press
this
key
to
adjust
the unit's
sensitivity
and
Grayline.
RANGE
-
This
key
lets
you
adjust
the
range
when the unit is in the
manual
mode.
ZOOM
-
The UltraNav II
gives you
2X
and 4X zoom
capabilitywith
this
key.
AUTO
-
This turns
the automatic
feature off and on.
MENU
-
Press
this
key
to show
the menus and
gain
access
to most
functions.
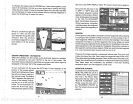
SELECT NMEA
The
UltraNav II
sends data outthewhite wire onthe
powercableaccording
to
standards set
by
the NMEA
(National
Marine
Electronics
Association).
This
allows the UltraNav II to send
position,
depth,
and
navigation
information
to "listener"
units,
such as
charting instruments,
autopilots,
and
other
marine instruments. The UltraNav II uses
the
following
NMEA data
protocols:
NMEA 0180
and 0183. NMEA 0180
sends
steering
information
only.
It's useful
mainly
for
autopilots.
NMEA 0183
sends
depth, position,
steering, speed,
and more. In order to use this
feature,
the white wire on
the
power
cable
must be connected to the
NMEA data
input
on the other
instrument. See the installation section in the
front of this manual for
wiring
connection information.
The
UltraNav II also has the
capability
to receive differential
data from a beacon receiver.
This
gives
the unit much better
accuracy
thannormal. Howev-
er,
before
purchasing
and in-
stalling
a beacon
receiver,
make
certaintherearetransrnitters in
the area
you
wish to use.
Pres-
ently
the UltraNav II can use
the
Magnavox
MX-50R or
StarLink MRB-2A. Please note that the
UltraNav II doesn't send NMEA
0183 data when the
Magnavox
MX-50R
beacon receiver is activated.
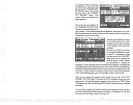
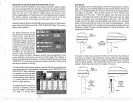
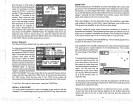
NMEA SETUP
Once
you
connect the
wiring properly,
the
UltraNav II must be told which
NMEA
data format to use. Consult
the owner's manual of the other
equipmentto
seewhich format it needs. Then
setthe UltraNav II as follows:
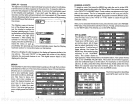
First,
press
the MENU
key. Next, press
the
key
next to the "CHANGE G
PS
SETTINGS" label. Now
press
the
key
next to the "SELECT NMEA" label.
The screen shown above
appears.
The data format
currently
in use
shows at the
top
of the screen. Press the
key
next to the desired data
output.
Now
press
the CLEAR
key.
The
UltraNav II will return to the last used GPS
screen and send NMEA data
out the white wire on the
power
cable.
6
71
NTLY
USING:
NIIEA
OFF'MAGHAUOX
PDF compression, OCR, web-optimization with CVISION's PdfCompressor