


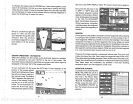
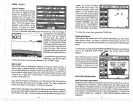
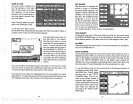

ZONE ALARM
The zone alarm consists of
a
bar that
appears
on the
right
side of the screen.
Any
echo
that
appears
on the
screen
between the
top
and bottom of
the zone alarm's bar
will
"trip"
the zone alarm.
Note:Thezone alarm isn'tavail-
able in the Windows mode.
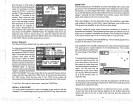
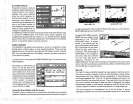
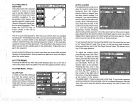
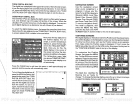
HE4LARM
.11
TURN FISH
LlI ON
URhZuNEALMQH
To set the zone
alarm,
press
the ALARM
key.
Now
press
the
key
next to the "Set Zone Alarm"
label. A
screen similar to the one
shown below
appears.
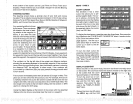
19L7FT11
N
Ii SET 2QNE
E
L0WER
LIMIT
<'CHINGE
TO
UPPER!
a
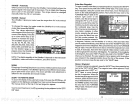
The zone
alarm bar shows on
the
right
side of the screen.
Use the
arrow
keys
to move
the bottom of the bar
higher
or
lower. To
move the
top
of the
bar,
first
press
the
key
next to
the "CHANGE TO UPPER" la-
bel. Now use the arrow
keys
to
move the
top
of
the
bar
higher
or lower. When
you
have the
zone alarm bar set as
desired,
press
the CLR
key
to erase the
menus.
The above
steps automatically
turn
the zone alarm on if it was off. To turn
the
zone
alarm
off,
press
the
ALARM
key,
then
press
the
key
next to the
"Turn Zone Alarm Off"label at the
bottom of the screen.
Normally,
the zone alarm bar
disappears
from the screen after
you
make
adjustments.
To
leave the zone
alarm baron the screen all of the
time,
see
the
"Display
Zone Alarm Bar"
section in this manual for instructions.
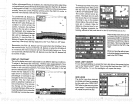
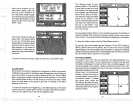
SET RANGE
Use this menu to
change
the
plotter's range
or distance
across the
plotter's display.
The
range
is 1 statute mile when the
UltraNav II is turned on for the
first time. The available
plotter
ranges
are
.1, .2, .5, 1, 2, 5, 10,
20,50,
and 100 miles. This lets
you
"zoom in"to see small varia-
tions in
your
course or "zoom
out" to see
your starting posi-
tion,
present position,
track, course,
and
destination.
ICON
ON/OFF
Pressing
this
key
turns on the icons that
you
placed
on the screen
using
the EVENT MARKER
key.
For more
information on this
feature,
see the
Event Marker section. This also turns on all of the
waypoint icons,
also.
ALARMS
Press this
key
for the alarms menu. For more information on the
alarms,
see the ALARMS section.
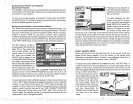
GOTO CURSOR
As
previously
described,
the cursor lines can
be used to
place
an icon or
highlightaposition.
When
you
usethecursorlines,
the
position
ofthecross
hairs on the
display
are shown at the
top
of the screen.
Pressing
the
key
next to the "GOTO CURSOR" label on the
plotter
menu causes
the
UttraNav II to show
navigation
and
steering
data to the
position
shown
by
the cross hairs. This
automatically
turns the arrival alarm
on,
also.
To use this
feature,
first move the cursor lines to the
the
plotter
screen.
Next,
press
the MENU
key. Finally, press
the
key
next to the "GOlD
CURSOR" label. The unit re
______
turns to the
plotter
screen. A
_______
waypoint flag appears
on the
screen
(numbered"O")thatwas
the location of the cursor cross
hairs when
you pressed
the
key
next to the "GOTO CUR
______
SOR" label.
_______
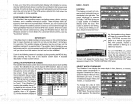
N 36°09.067' Ui 96°SO.646'
U1fl N
065
770
Ui
E
th
2700 S 21'lI
desired location on
20
57
PDF compression, OCR, web-optimization with CVISION's PdfCompressor