


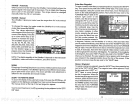
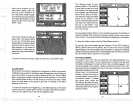

After
you've
entered the de-
sired
alarm
depth, press
the
key
next to the
"ACCEPT"
la-
bel. This enters the alarm
depth
ihto
memory
and
automatically
turns
theshallowalarmon. Now
press
the
key
next to the
"AC-
CEPT' label.
The screen
shown at
right ap-
pears
next. The
shallow alarm
is now set. If the bottom
goes
shallowerthan 1
Ofeet,
the
alarm
will sound and a
warning
mes-
sage appears
on the
screen at
the same time. A
label also
ap-
pears letting you
mute
the
alarm,
if desired.
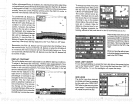
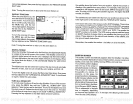
OLD. VALUE:. •0
tEW
VALUE;
10
IrPT
To
return to the sonar
screen,
press
the
key
next to the "EXIT" label.
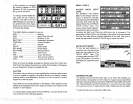
ALARM MUTE
When eitherthe shallow or
deep
alarm is
triggered,
an audio tone
sounds.
A different tone sounds
forthe shallowthan the
deep alarm,
thus
letting
you
know which alarm
is
sounding
without
looking
at the unit. Once a
depth
alarm is
triggered,
it
keeps sounding
until
you change depth.
For
example,
if the
shallow alarm is set to 10
feet,
and
you
move into and
stay
in water
that's five feet
deep, you're
going
to
get
tired of
listening
to the alarm
beeping
all the time.
To
keep
this situation from
happening,
a new label
appears
on the sonar
whenever a
depth
alarm sounds. This label
says
"Silence Alarm".
This turns the alarm's sound
off until it's
triggered again.
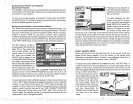
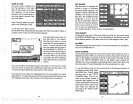
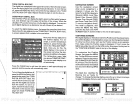
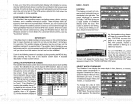
The
flashing
cross is
your
present
position.
The solid line
is
your track,
or
path you
have
just
traveled. The
large square
is a
compass
rose marked with
North, South, East,
and West.
The
square's height
and width
shows at the bottom of the
screen.This isthedistancefrom
one side to the other and from
the
top
to the bottom.
Your
present position
is shown atthe
top
of the screen.
...'
22.0
I
id E
1040
S 1111
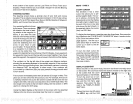
If
your
present position
starts to move outside the
square,
the UltraNav II
clears
the
display,
then re-draws
your present position
closerto the center
of the screen. Your
present position
will
always
be
displayed
on
the
plotter.
To clear the
plotter screen,
see the Plotter Menus
section,
On
the left side of the screen are the Distance To Go
(DTG), Bearing
(BRG), Speed
Over
Ground
(503),
and Course Over Ground
(COG)
digital displays.
All of these
displays
are used when
awaypoint
is
recalled,
except
COG that is
always
active. These
displays
also
can
be
customized.
See the Plotter Menus section for more detail.
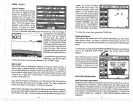
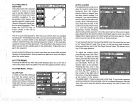
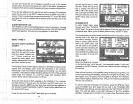
PLOTTER CURSOR
The
plotter
cursor can
help
you
determine the
latitude/longitude
of a
waypoint
or event marker. To use
it, press
the
up
or down arrow
key
while
the
plotter
is
displayed.
A
screen similar to the one below
appears.
Two
new lines
appear
on the screen. These
are the
plotter
cursor lines.
Also,
the
present position display
at the
top
of the screen switches to show the
latitude/longitude position
of the
plottercursor- notyourpresent
position.
Use the arrow
keys
to
move the
plotter
cursor lines to
the desired location. To erase
the cursor
lines, press
the
CLEAR
key.
This
alsowill switch
the
position display
atthe
top
of
the screen backto
showing your
present position.
I1*MM
LZS*ft
•flM N
,22.fl,
A
w:
+
k
k
28°
S 1111
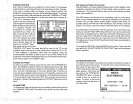
]USE
NUMERIC
KEYët1
!
CHANGE LJflLUE. USE
I RIGHT ARROW TO
BACKSPACE.
22
55
PDF compression, OCR, web-optimization with CVISION's PdfCompressor