


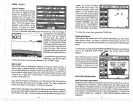
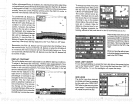
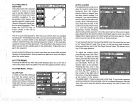
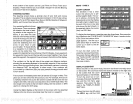

PLOTFING WITH A
WAYPOINT
Usingthe
plotterwith
arecalled
waypoint
or route is an
easy
•
way
to see the effects of wind
•
andcurrentonyourboat.
Italso
•
simplifies navigation.
To use
plotter
in this
manner,
first
recall
awaypoint
orstart a route.
•
(See
the
Waypoint
Recall sec-
•
tionfor more
information.)
Then
•
press
the PLOTTER
key.
A
screen similar to the one at
appears.
36°09.037' W 95°EQ
403'
a
1.10•
/•
s
/
22.0
'
W
.....
fi
—
132 S
2M1
The "5" is
your starting
location. This was
your position
when
you
recalled
the
waypoint.
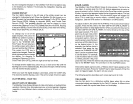
The
flashing
circle with a cross is
your present position.
The
"flag"
with a number
inside is the destination
(recalled waypoint).
The
number inside the
flag
is the recalled
waypoint
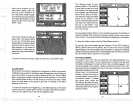
number. In this
example,
waypoint
number 10 is the destination. The dotted line isthe
shortest,
most
direct course from the
starting point
to the destination.
Follow
this
line to
get
to the
waypoint.
An arrival alarm can be set to
sound atone when
you
come within a
preset
distance to the
destination. See the section on alarms for more information
about the arrival alarm.
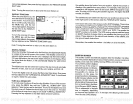
PLO1TER MENUS
Pressing
the MENU
key
while the
plotter displays gives
you
a new set of
menus that relate
only
to the
plotter.
There are two
pages
of
plotter
menus.
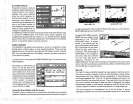
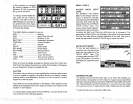
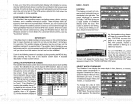
DEPTH ALARMS
The
depth
alarms sound atone
when the bottom
signal goes
shallower
than the shallow
alarm's
setting
or
deeper
than
the
deep
alarm's
setting.
For
example,
if
you
set the shallow
alarm to ten
feet,
the alarm will
sound a tone if the bottom
sig-
nal is less than ten feet. It will
continuetosound until
you
mute
it or until the bottom
goes
deeper
than 10 feet. The
deep
alarm works
just
the
opposite.
It sounds a
warning
tone if
the bottom
depth
goes deeper
than the alarm's
setting.
Both
depth
alarms work
only
off the
digital
bottom
depth signals.
No other
targets
will
trip
these alarms. These
alarms can be used at the same time or
by
themselves.
To setthe
depth
alarms,
first
press
the
MENU
key,
then
press
the
key
next
to the
"Adjust
Alarms" label. The screen on the
previous page appears.
Now
press
the
key
next to the "Set
Depth
Alarms" label. The screen at the
top
of this
page appears.
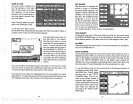
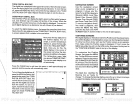
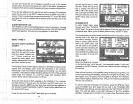
To
adjust
the shallow
alarm,
press thekey
next to the "Shal-
low" label. To
adjust
the
deep
alarm,
press
the
key
next to the
"Deep"
label. Both alarms ad-
just identically.
We'll use the
shallow alarm as an
example.
Pressing
the
key
next to the
"Shallow" label movesthe black
box
from the "OFF"
postion
to
the number on the
right
side of
the arrow. Anew label
appears
at the bottom of the screen:
"CHANGE LIMIT."
Press the
key
next to that label. A new screen
appears
as
shown
atthetop
of the
nextpage.
Usethe numbered
keypad
onthe
right
side of the unit to enter the shallow
alarm
setting.
We used 10
feet in this
example.
PLOTTER MENU
-
PAGE 1
CLEAR PLOT
To clear orerase the
solid track
line from the
screen,
use
the
Clear Plot menu selection.
The
plotterwillcontinuetodrawyour
track after this
key
is
pressed,
starting
from
your present posi-
tion.
58
21
PDF compression, OCR, web-optimization with CVISION's PdfCompressor