


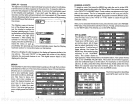
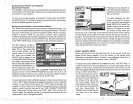

Name
a Route
To
assign
a name to a
route,
press
the
key
next to the "-i-ATE"
or "-RTE"
label to move
through
the list of routes. When the
desired
route number
appears
in the window at the
top
of the
screen,
press
the down arrow
key
until the black box moves to the "NAME"
position.
Now
press
the
key
next
to the "CHANGE" label. The screen shown below
appears.
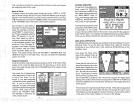
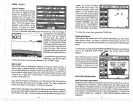
Use the
keys
on both sides of
the screen to
enterthe
waypoint
name. For
example,
to name a
route"REEFl",
pressthe
num-
ber "4"
key repeatedly
until the
letter "R"
appears
in the win-
dow.
Next, press
the
right
ar-
row
key
to move the black box
to the next
letter
position.
Now
press
the "1"
key.
The letter"E"
appears
on the screen.
Repeat
this
process
until the entire
name has been wriften on the
screen. Now
press
the
key
next to the "ACCEPT" or "ENTER" label. The
UltraNav
II returns to the route menu. You can now enter the
waypoints
used
in the route.
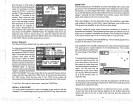
Waypoint
Selection
If
you've
named a
route,
the black box should be on the "0"
atthetop
of the
screen. If
not,
move the
black box to the
"0"using
the
up
or down arrow
H
keys.
Now
press
the
key
next to the "CHANGE' label. The screen shown
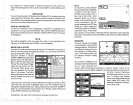
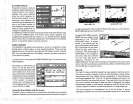
Now
press
the numbered
key
of the
waypoint you
wish to
go
to
first in the route. For ex-
ample,
if
you
want
waypoint
number 8to be
first,
press
the 8
key.
If
you've
named the
waypoint,
it shows in the blank
spacetothe rightofthewaypoint
number.
Next,
press
the
key
next to the "ACCEPT" label.
The UltraNav II reverts to the
menu shown above.
RTE# 6
NAME REEF1
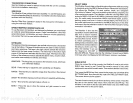
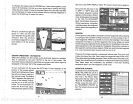
To see all of the
available win-
dows, press
the
WINDOWS
key,
then
press
the MENU
key.
Now
press
the
key adjacent
to
the "MAIN
MENU" label. Fi-
nally, press
the
key
next to the
'VIEW
ALL WINDOWS" label.
The screen
at
right appears.
The firstwindow
appears
in the
upper
right
cornerof
the screen.
A
description
of the
screen
shows in the box at
the bottom of the screen. Now
press
the
key adjacent
to the "NEXT' label. This
changes
the
displayed
window and
description.
When
you've
finished
viewing
the
windows,
press
the
CLEAR
key.
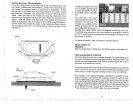
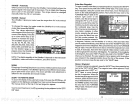
SIDE-SCAN OPERATION
Twp different side scan
displays
are available when the UltraNav II is in the
Windows mode. To use the side scan
feature,
first install the ScanPac
transducer
on
your trolling
motor.
Next,
press
the WINDOWS
key
on the
UltraNav
Il unit.
Now
press
the down arrow
key
until the screen shown at
right appears.
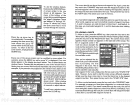
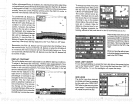
This is
group
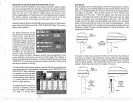
These
are the side scan win-
dows. Bothwindowsshowthe
digital depth display
from the
transducer
pointed
at the bot-
tom
-
Not the side scan trans-
ducer. The window
on the left
shows a Fish ID
symbol
when
0
LS
ni
flL__
FISH 36.5 FT
11!FDcPTH
48.1
the unit identifies
a
target
as a fish. When this
happens,
the
digital depth
display
at the bottom of the
window
changes
from
"DEPTH" to "FISH" and
shows the
distance from the side scan transducer to the
target
shown as
a fish
symbol.
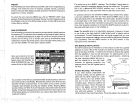
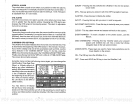
This menu lets
you
select the route
number,
name the
route,
and
choose
VIEWING
WINDOWS
_______________________________
the
waypoints
used in the route.
I
FEET
I
Digital Depth
WATER
DEPTH DISPLAY.
DEPTH
ALARMS AND
UNITS OF
MEASURE
ARE SET IN MENU.
below
appears.
I U
U
0
66
The window on the
right
shows all return echoes. These echoes
appear
as
short,
horizontal lines.
The thicker the
line,
the
stronger
the
return echo.
The
distancetothesetargets
can
be
determined
bycomparingthe position
of the echo to the
range
markers on the side of the
display.
11
PDF compression, OCR, web-optimization with CVISION's PdfCompressor